OIDC JWT Authentication
OpenID Connect (OIDC) token-based authentication in JSON web token (JWT) format, allows TigerGraph users better control over application access. Helping to secure users and their data.
OIDC JWT Authentication in TigerGraph
Some basic understanding of TigerGraph’s user access through Enabling User Authentication and Built-in API Endpoints is recommended before continuing.
What is OIDC?
OpenID Connect (OIDC) serves as an identity layer integrated with the OAuth 2.0 framework. It enables third-party applications to authenticate the end-user’s identity and access basic user profile information.
For more information on OIDC see OpenID’s documentation.
What is JWT?
OIDC utilizes JSON web tokens (JWTs), obtainable through flows that adhere to OAuth 2.0 specifications. JWTs are an open standard. It allows for a JSON object to be exchanged between two parties securely and in a compact and easily containable way.
For more information please see the documentation Introduction to JSON Web Tokens.
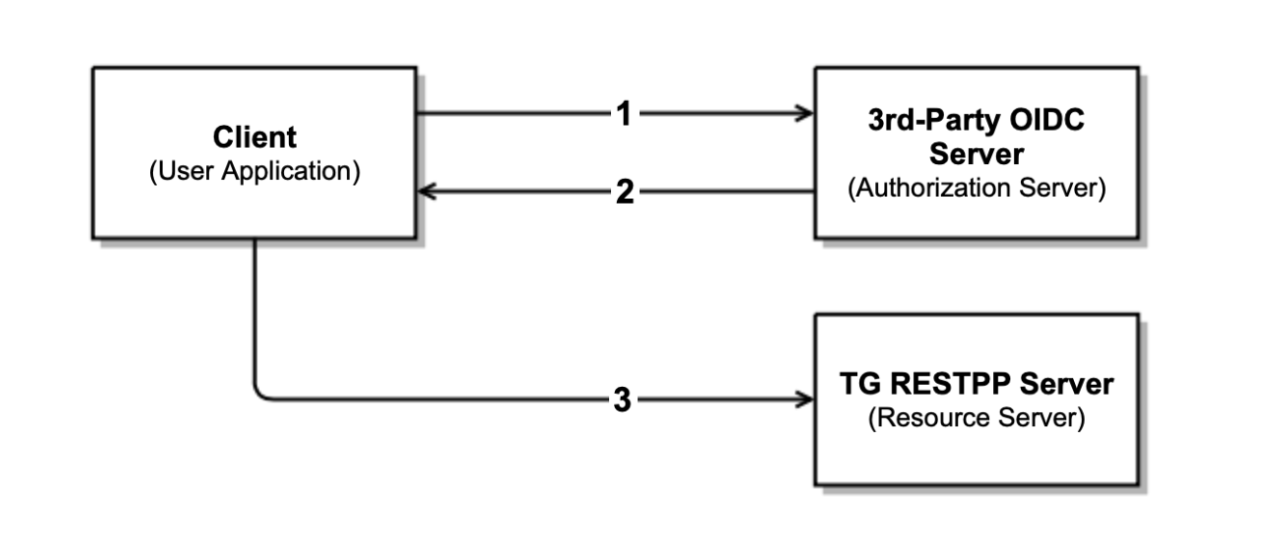
Authentication Workflow
At a high level the authentication workflow is as following:
-
The user application or the client requests authorization from the third-party OIDC server or authorization server.
-
The authorization server validates the request and, if successful, responds with an access token.
-
The user application or the client uses the access token with the Bearer authentication scheme in the HTTP Authorization header to access a protected resource from the TG RESTPP server.
Access Token
A JWT includes a JSON object containing information meant for sharing.
To ensure data integrity, each JWT is cryptographically signed, preventing unauthorized modification by clients or malicious parties.
The payload data within the JWT consists of key-value pairs, commonly referred to as JWT "claims".
These claims encompass essential information such as details about the authenticated user, issue time, expiration time, and various other attributes.
For more information on claims, please see this link on Json Web Token Claims.
eyJhbGciOiJIUzI1NiIsInR5cCI6IkpXVCJ9.eyJzdWIiOiIxMjM0NTY3ODkwIiwibmFtZSI6IkpvaG4gRG9lIiwiaWF0IjoxNTE2MjM5MDIyfQ.SflKxwRJSMeKKF2QT4fwpMeJf36POk6yJV_adQssw5c
# header
{
"alg":"RS256",
"typ":"JWT"
}

# payload data
{
"iss": "TigerGraph Inc",
"aud": ["a","b"],
"exp": 1647334196,
"sub": "kevin",
"iat": 1516239022,
"graph": "test_graph"
}

# signature
RSASHA256(
base64UrlEncode(header) + "." +
base64UrlEncode(payload),
<Public-Key>,
<Private-Key>)
)
Let’s now break down this output in more detail.
Header
The JSON Object Signing and Encryption Header comprises a set of Header Parameters.
That consists of a name/value pairs like the hashing algorithm being used (e.g. HMAC, or RSA) as alg and the typ or type of token.
# header
{
"alg":"RS256",
"typ":"JWT"
}
Supported cryptographic algorithms for both signing and verification are below:
| Supported Algorithm | Types |
|---|---|
HMAC |
HS256, HS384, HS512 |
RSA |
RS256, RS384, RS512 |
Payload
The payload contains statements about the entity (typically, the user) and any additional attributes, which are again, referred to as claims.
# payload data
{
"iss": "TigerGraph Inc",
"aud": ["a","b"],
"exp": 1647334196,
"sub": "kevin",
"iat": 1516239022,
"graph": "test_graph"
}
Currently supported claims are as follows:
| Claim / Payload Field | Type | Description |
|---|---|---|
|
string |
[optional] Issuer of the JWT Token. |
|
string |
[optional] Recipient for which the JWT is intended. |
|
int |
Time after which the JWT expires. |
|
string |
Subject of the JWT, this is the TigerGraph Username |
|
int |
Time at which the JWT was issued; can be used to determine age of the JWT |
|
string |
[optional] Graph reference in the token. Defines the scope of the privileges for the user. The scope is set to global if no “graph” is specified. |
For more information on claims and claims not yet supported, please see JWT documentation, under the section head “Payload”.
Signature
The signature is used to verify that the sender of the JWT is who it says it is and to ensure that the message wasn’t changed along the way.
# signature
RSASHA256(
base64UrlEncode(header) + "." +
base64UrlEncode(payload),
<Public-Key>,
<Private-Key>)
)
To create the signature, the Base64-encoded header and payload are taken, along with a secret or private key, and signed with the algorithm specified in the header.
HMAC and RSA algorithms are supported for signing and verification.
User Guide Overview
To use a JWT token for authentication three things should be done first.
-
Enable RESTPP Authentication
-
Configure the JWT Token
-
Generate a 3rd Party JWT Token
These three steps can be done in any order.
For testing purposes, users can generate a public key using a public tool such as https://cryptotools.net/rsagen or use the public key generated from the JWT token generator.
|
Ensure that the public key configured and the public key in the JWT Token match. |
Scope of Access
Access tokens without the graph claim are global tokens and inherit all permissions of the user on any graph.
Tokens with the graph claim only inherit permissions for the specified graph assigned to the user.
Apply Configuration Changes
When using gadmin config to change any parameters, you need to run gadmin config apply -y for it to take effect.
You can change multiple parameters and then run gadmin config apply for all of them together.
gadmin config apply -y
gadmin restart restpp -y
Setup JWT Token gadmin Configuration
There are four key configuration items for JWT token authentication, each with a defined priority to handle authentication.
Configuration
-
Security.JWT.RSA.PublicKeyThe public key used for JWT authentication when using the RSA algorithm. -
Security.JWT.HMAC.SecretThe secret key used for JWT authentication when using the HMAC algorithm. -
Security.JWT.JWKS.URLThe URL where the JWKS (JSON Web Key Set) can be accessed. The system uses this URL to fetch the JWT certificate dynamically using the Key ID (kid). -
GSQL.Token.HMACSecretThe HMAC secret used for JWT authentication in GSQL operations.
Configuration Item Priorities
These configuration items work in a prioritized order for JWT authentication. Here’s how the system handles authentication:
-
Priority 1: If
Security.JWT.JWKS.URLis set, the system looks for the kid in the JWT headers. If the related RSA Public Key or HMAC Secret is found in the JWKS, it is used for authentication. -
Priority 2: If kid is not set in the JWT headers or the related key is not found in the JWKS, the system falls back to using either the RSA key (
Security.JWT.RSA.PublicKey) or the HMAC secret (Security.JWT.HMAC.Secret), depending on the algorithm specified in the JWT. -
Fallback Option: If the JWT iss (issuer) claim is set to "TigerGraph," the system will use
GSQL.Token.HMACSecretfor authentication.
|
The kid (Key ID) in the JWT headers refers to a specific RSA public key or HMAC key in the JWKS. It is unique for each key and helps identify which key to use for authentication. |
There are two ways to configure a public key or secret of a JWT token in TigerGraph through gadmin config set.
-
Non-Interactive
-
Interactive
Both instances, users need to specify the URL of the public key or secret in the configuration or use “@filepath” when specifying either the public or secret key content from a separate file in your environment.
Non-Interactive
Users can configure JWT token non-interactively by using the gadmin CLI tool by running one of these commands for RSA or HMAC.
RSA
$ gadmin config set Security.JWT.RSA.PublicKey <public-key content or URL or @filepath>
$ gadmin config set Security.JWT.RSA.PublicKey "
> -----BEGIN PUBLIC KEY-----
> MIGfMA0GCSqGSIb3DQEBAQUAA4GNADCBiQKBgQCmFEHTpcKKKUl/L/gu5Vt5xKTT
> FCj1YpJmsGabB6p5MqlDhXP/UZg29vVxN5eTXKULv8ITWcSDfYQ1YmDmj0cP8kDu
> n5WhOYiBK7vufuECtgQ1B8fMMCd7RMoqdnQLrwGDTFqqVm6jfOXnbXDX6zfkAnmv
> qDxmUcsvNZMzoDOvyQIDAQAB
> ----END PUBLIC KEY----
> "
[   Info] Configuration has been changed. Please use 'gadmin config apply' to persist the changes.
$ gadmin config set Security.JWT.RSA.PublicKey https://storage.com/qe-test-data/public_key_test.pem
[   Info] Configuration has been changed. Please use 'gadmin config apply' to persist the changes.
$ gadmin config set Security.JWT.RSA.PublicKey @test.pem
[   Info] Configuration has been changed. Please use 'gadmin config apply' to persist the changes.
HMAC
$ gadmin config set Security.JWT.HMAC.Secret <shared-secret-key content or URL or @filepath>
$ gadmin config set Security.JWT.HMAC.Secret "S2V5LU11c3QtQmUtYXQtbGVhc3QtMzItYnl0ZXMtaW4tbGVuZ3RoIQ=="
[   Info] Configuration has been changed. Please use 'gadmin config apply' to persist the changes.
$ gadmin config set Security.JWT.HMAC.Secret https://storage.com/qe-test-data/public_key_test.pem
[   Info] Configuration has been changed. Please use 'gadmin config apply' to persist the changes.
$ gadmin config set Security.JWT.HMAC.Secret @test.pem
[   Info] Configuration has been changed. Please use 'gadmin config apply' to persist the changes.
Optional Configurations
This next configurations are optional.
Users may also specify the JWT issuer and audience. The default for both these claims are empty.
Security.JWT.Issuer
$ gadmin config set Security.JWT.Issuer "<issuer-name>"
If Security.JWT.Issuer is configured, the iss claim will be verified against this configured value. Otherwise, the issuer will not be verified.
Security.JWT.Audience
$ gadmin config set Security.JWT.Audience "<audience-name>"Users can set this JWT Token authentication to verify if the aud (recipient for which the JWT is intended) defined in the JWT Token matches the configured one or not.
If the user configures this claim and the token does not match with a value in the
aud string, then the JWT will fail.
{"version":{"edition":"enterprise","api":"v2","schema":0},"error":true,"message":"Access Denied because the input token = 'eyJh****4WgE' contains audience [a,b], which doesn't include the configured one c","code":"REST-10016"}|
Audience strings are case-sensitive. |
Interactive
Additionally, users can set up JWT, interactively, by running this command to begin security configuration:
gadmin config entry security
$ gadmin config entry security
Security.JWT.Issuer [ ]: The Issuer for jwt token header
New: User

Security.JWT.RSA.PublicKey [  ]: Set Public key for JWT token auth
[Warning] Please use @filepath to set value of Security.JWT.RSA.PublicKey in interactive mode, or leave it empty to skip
New: @/path/to/pub.file

Security.JWT.HMAC.Secret [  ]: Set Secret for JWT token auth
[Warning] Please use @filepath to set value of Security.JWT.HMAC.Secret in interactive mode, or leave it empty to skip
New:
[   Info] no changes for Security.JWT.HMAC.Secret
Generate a 3rd Party JWT Token
The JWT token is generated by a 3rd party authentication server from the customer side. For testing purposes, we recommend using a tool such as this one though any JWT token generated will also work.
[NOTE] Prior to version 4.1.2, GSQL server REST endpoints did not accept JWT tokens.
{
"iat": 1699205547,
"exp": 1703865599,
"iss": "TigerGraph",
"aud": ["a","b"],
"sub": "tigergraph",
"graph": "graph"
}
Here is an example of the generated token from the payload data.
Use JWT Token
Now that the JWT token is generated, its usage is the same as using a GSQL plain text token, allowing access to RESTPP endpoints.
For example, this is used to run the query {queryName} on the graph {graphName}:
curl -s -H "Authorization: Bearer <JWT-TOKEN>" -X GET http://127.0.0.1:14240/restpp/query/{graphName}/{queryName}
Potential Error Messages
When using a JWT token for authentication, please consider these scenarios and handle the corresponding errors appropriately when working with JWT tokens for authentication.
| Error Type | Description |
|---|---|
Expiration |
If the token has expired, an error is thrown to indicate its expiration. |
User/Graph Existence |
If the user specified by sub claim does not exist in the TigerGraph system, an error is thrown to indicate the user does not exist. |
Graph Scope |
If the graph specified in the token is not accessible to the user due to insufficient permissions, an error is thrown to indicate permission denied. |
Issuer Match |
If the issuer in the token does not match the configured issuer value set by |
Audience Match |
If the audience configured in the token does not match, an error throws indicating it is invalid. |
Format |
If the token is in an incorrect format, contains invalid JSON or fails in base64 decoding, an error throws to indicate format or decoding failure. |
Verification |
If the verification process of the JWT token fails, an error is thrown to indicate verification failure. |
Other |
Any other exceptions not mentioned above, an error throws to indicate an invalid token. |
CA certificate
Users need to rely on a CA certificate (corresponding to the environment variable SSL_CA_CERT) to establish the connection with the URL being set.
This env config is only needed when the URL fails with the error log recorded in the RESTPP log file:
I1207 11:57:25.605924 10349 sys_utility.cpp:275] Engine_RESTPP_system_utility|read URL content encountered an error in curl_easy_perform():
Problem with the SSL CA cert (path? access rights?).
The storage location of the CA certificate also may differ with the operating system being used.
-
In Ubuntu, by default, it is set as a single file (PEM bundle) in
/etc/ssl/certs/ca-certificates.crt. -
In Centos, by default, the SSL certificates on CentOS are stored in the
/etc/pki/tls/certs/directory.
Provided is an option for users to customized their own storage location of CA certificate by setting SSL_CA_CERT in RESETPP.BasicConfig.Env.
For Example:
-
Get the current environment variable list in TigerGraph with:
gadmin config get restpp.BasicConfig.Env
-
Then add
SSL_CA_CERT = /path/to/cacertificatein theRESETPP.BasicConfig.Envlist with:gadmin config set rsestpp.BasicConfig.Env ${new env variables list}Here is an example
Run get:gadmin config get restpp.BasicConfig.Env
Sample Output:LSAN_OPTIONS=suppressions=/home/tigergraph/suppressions.txt; LD_PRELOAD=/home/tigergraph/tigergraph/app/3.10.0/.syspre/usr/lib/x86_64-linux-gnu/libasan.so.5:$LD_PRELOAD; LD_LIBRARY_PATH=$LD_LIBRARY_PATH; ASAN_OPTIONS=detect_leaks=0:alloc_dealloc_mismatch=0;
Run set and apply and restart:gadmin config set RESTPP.BasicConfig.Env " LSAN_OPTIONS=suppressions=/home/tigergraph/suppressions.txt; LD_PRELOAD=/home/tigergraph/tigergraph/app/3.10.0/.syspre/usr/lib/x86_64-linux-gnu/libasan.so.5:$LD_PRELOAD; LD_LIBRARY_PATH=$LD_LIBRARY_PATH; ASAN_OPTIONS=detect_leaks=0:alloc_dealloc_mismatch=0; SSL_CA_CERT=/home/tigergraph/cacertificate/example/; " gadmin config apply -y gadmin restart -y
|
Existing environment variable may have some influence on the current use of TigerGraph. |
Usage of GSQL JWT Token
|
As of version 4.1.0, token generated by TigerGraph’s REST API (e.g. |
create JWT Token
POST :14240/gsql/v1/tokens payload '{"secret":"<secret>", "graph":"<graph name>, lifetime: <number in ms>"}'
-
secret: Thesecretrepresents the user. If a secret is provided in the payload, user login is not required. If no secret is specified in the payload, a secret will be automatically generated. -
graph: Thegraphdefines the scope within which the token can be used. If no graph is specified, the token becomes a global token, applicable to all endpoints. -
lifetime: Thelifetimespecifies the duration for which the token can be used, measured in milliseconds. If no lifetime is specified, the default duration is 7 days.
drop JWT Token
Since the JWT token cannot be deleted as it has been created, a block list is created to include JWT tokens that are restricted to access on RESTPP and GSQL server.
Clear drop list: clear current user’s block list.
DELETE :14240/gsql/v1/tokens?clear=true"
Drop specific JWT Tokens: add JWT tokens to current user’s block list.
DELETE :14240/gsql/v1/tokens" -d '{"tokens":"$token1, $token2, …"}'