Encrypting Data At Rest
Encryption Levels
The TigerGraph graph data store uses a proprietary encoding scheme which both compresses the data and obscures the data unless the user knows the encoding/decoding scheme. In addition, the TigerGraph system supports integration with industry-standard methods for encrypting data when stored in disk ("data at rest").
Data at rest encryption can be applied at many different levels. A user can choose to use one or more level.
| Encryption Level | Description | TigerGraph Support |
|---|---|---|
Hardware |
Use specialized hard disks which perform automatic encryption on write and decryption on read (by authorized OS users) |
Invisible to TigerGraph |
Kernel-level file system |
Use Linux built-in utilities to encrypt data. Root privilege required. |
Invisible to TigerGraph |
User-level file system |
Use Linux built-in utilities and customized libraries to encrypt data. Root privilege is not required. |
Invisible to TigerGraph |
Kernel-level Encryption
File system encryption employs advanced encryption algorithms. Some tools allow the user to select from a menu of encryption algorithms. It can be done either in kernel mode or user mode. To run in kernel mode, superuser permission is required.
Since Linux 2.6, device-mapper has been an infrastructure, which provides a generic way to create virtual layers of block devices with transparent encryption blocks using the kernel crypto API.
In Ubuntu, full-disk encryption is an option during the OS installation process. For other Linux distributions, the disk can be encrypted with dm-encrypt.
A commonly used utility is eCryptfs, which is licensed under GPL, and it is built into some kernels, such as Ubuntu.
User-Level Encryption
If root privilege is not available, a workaround is to use FUSE (Filesystem in User Space) to create a user-level filesystem running on top of the host operating system. While the performance may not be as good as running in kernel mode, there are more options available for customization and tuning.
Example 1: Kernel-mode file system encryption with dm-crypt
In this example, we use dm-crypt to provide kernel-mode file system encryption. The dm-crypt utility is widely available and offers a choice of encryption algorithms. It also can be set to encrypt various units of storage — full disk, partitions, logical volumes, or files.
The basic idea of this solution is to create a file, map an encrypted file system to it, and mount it as a storage directory for TigerGraph with R/W permission only to authorized users.
Prerequisites
Before you start, you will need a Linux machine on which
-
you have root permission,
-
the TigerGraph system has not yet been installed,
-
and you have sufficient disk space for the TigerGraph data you wish to encrypt. This may be on your local disk or on a separate disk you have mounted.
|
You do not need to re-encrypt a disk after resizing it (for example, resizing a persistent disk in GCP). Kernel-level encryption remains intact after a disk resize. |
Instructions
-
Install cryptsetup (cryptsetup is included with Ubuntu, but other OS users may need to install it with yum).
-
Install the TigerGraph system.
-
Grant sudo privilege to the TigerGraph OS user.
-
Stop all TigerGraph services with the following commands: gadmin stop all -y gadmin stop admin -y
-
Acting as the tigergraph OS user, run the following export commands to set variables. Replace the placeholders enclosed in angle brackets <…> with the values of your choice:
# The username for TigerGraph Database System, for example: tigergraph
export db_user='<username>'

# The path of encrypted file to be created for TigerGraph storage, for example: /home/tigergraph/secretfs
export encrypted_file_path='<path-to-encrypted-file>'

# The size of encrypted file to be created (used by dd command), for example: 60G
export encrypted_file_size=<storage-size>

# The password for the encrypted file, for example: DataAtRe5tPa55w0rd
export encryption_password='<password>'

# The root directory for tigergraph, for example: $HOME/tigergraph
export tigergraph_data_root="<tigergraph-data-root>"

# Set the first available loop device for encrypted file mapping
export loop_device=$(losetup -f)-
Create a file for TigerGraph data storage.
dd of=$encrypted_file_path bs=$encrypted_file_size count=0 seek=1-
Change the permission of the file so that only the owner of the file (that is, only the tigergraph user who created the file in the previous step) will be able to access it:
chmod 600 $encrypted_file_path-
Associate a loopback device with the file:
sudo losetup $loop_device $encrypted_file_path-
Encrypt storage in the device. cryptsetup will use the Linux device mapper to create, in this case, $encrypted_file_path . Initialize the volume and set a password interactively with the password you set to $encryption_password :
sudo cryptsetup -y luksFormat $loop_deviceIf you are trying to automate the process with a script running with root TTY session , you may use the following command:
echo "$encryption_password" | cryptsetup -y luksFormat $loop_device-
Open the partition, and create a mapping to $encrypted_file_path :
sudo cryptsetup luksOpen $loop_device tigergraph_gstoreIf you are trying to automate the process with a script running with root TTY session , you may use the following command:
echo "$encryption_password" | cryptsetup luksOpen $loop_device tigergraph_gstore-
Clear the password from bash variables and bash history.
|
The following commands may clear your previous bash histories as well. Instead, you may edit ~/.bash_history to selectively delete the related entries. |
unset encryption_password
history -c
history -w-
Create a file system and verify its status:
sudo mke2fs -j -O dir_index /dev/mapper/tigergraph_gstore-
Mount the new file system to /mnt/secretfs:
sudo mkdir -p /mnt/secretfs
sudo mount /dev/mapper/tigergraph_gstore /mnt/secretfs-
Change the permission to 700 so that only $db_user has access to the file system:
sudo chmod -R 700 /mnt/secretfs
sudo chown -R $db_user:$db_user /mnt/secretfs-
Move the original TigerGraph files to the encrypted filesystem and make a symbolic link. If you wish to encrypt only the TigerGraph data store (called gstore), use the following commands:
mv $tigergraph_data_root/gstore /mnt/secretfs/gstore
ln -s /mnt/secretfs/gstore $tigergraph_data_root/gstore
There are other TigerGraph files which you might also consider to be sensitive and wish to encrypt. These include the dictionary, kafka data files, and log files. You could selectively identify files to protect or you could encrypt the entire TigerGraph folder(App/Data/Log/TempRoot). In this case, simply move $tigergraph_data_root instead of $tigergraph_data_root/gstore.
mv $tigergraph_data_root /mnt/secretfs/tigergraph
ln -s /mnt/secretfs/tigergraph $tigergraph_data_root
The data of TigerGraph data is now stored in an encrypted filesystem. It will be automated decrypted when the tigergraph user (and only this user) accesses it.
To automatically deploy this encryption solution, you may
-
Chain all the steps as a bash script
-
Remove all "sudo" since the script will be running as root.
-
Run the script as root user after TigerGraph Installation.
|
The setup scripts contain your encryption password. To follow good security procedures, do not leave your password in plaintext format in any files on your disk. Either remove the setup scripts or edit out the password. |
Performance Evaluation
Encryption is usually CPU-bound rather than I/O-bound. If CPU usage reamains below 100%, encryption should not cause much performance slowdown. A performance test using both small and large queries supports this prediction: for small (~1 sec) and large (~100 sec) queries, there is a ~5% slowdown due to filesystem encryption.
| GSE Cold Start (read) | Load Data (write) | |
|---|---|---|
original |
45s |
809s |
encrypted |
47s |
854s |
% slowdown |
4.4% |
5.8% |
We used the TPC-H dataset with scale factor 10 ( http://www.tpc.org/tpch/). The data size is 23GB after loading into TigerGraph..The write test (data loading) was done by running a loading job and then killing the GPE with SIGTERM (to exit gracefully) to ensure that all kafka data is consumed.The read test (GSE cold start) measures the time from "gadmin start gse" until "online" appears in "gadmin status gse".
Example 2: Encrypting Data on Amazon EC2
Major cloud service providers often provide their own methodologies for encrypting data at rest. For Amazon EC2, we recommend users start by reading the AWS Security Blog: How to Protect Data at Rest with Amazon EC2 Instance Store Encryption.
In this section, we provide a simple example for configuring file system encryption for a TigerGraph running on Amazon EC2. The steps are based on those given in How to Protect Data at Rest with Amazon EC2 Instance Store Encryption, with some additions and modifications.
The basic idea of this solution is to create a file, map an encrypted file system to it, and mount it as a storage directory for TigerGraph with permission only to authorized users.
|
Angle brackets <…> are used to mark placeholders which you should replace with your own values (without the angle brackets). |
Prerequisites
Make sure you have installed and configured AWS CLI with keys locally.
Create an S3 Bucket
Sign in to the S3 console and choose Create Bucket .
In the Bucket Name box, type your bucket name and then choose Create .
You should see the details about your new bucket in the right pane.
Configure IAM roles and permission for the S3 bucket
1.Sign in to the AWS Management Console and navigate to the IAM console . In the navigation pane, choose Policies , choose Create Policy . Choose the JSON tab, paste in the following JSON code, and then choose Review Policy . Name and describe the policy, and then choose Create Policy to save your work. For more details, see Creating Customer Managed Policies .

{
    "Version": "2012-10-17",
    "Statement": [
        {
            "Sid": "VisualEditor0",
            "Effect": "Allow",
            "Action": "s3:GetObject",
            "Resource": "arn:aws:s3:::<your-bucket-name>/LuksInternalStorageKey"
        }
    ]
}
The preceding policy grants read access to the bucket where the encrypted password is stored. This policy is used by the EC2 instance, which requires you to configure an IAM role. You will configure KMS permissions later in this post.
(The following instructions have been updated since the original blog post.)

2."Select type of trusted entity: Choose AWS service .
3."Select the service that will use this role": Choose EC2 then choose Next: Permissions.
4.Choose the policy you created in Step 1 and then choose Next: Review.
5.On the Create role page, type your role name , a Role description, and choose Create role .
6.The newly created IAM role is now ready. You will use it when launching new EC2 instances, which will have the permission to access the encrypted password file in the S3 bucket.
Create a KMS Key (optional)
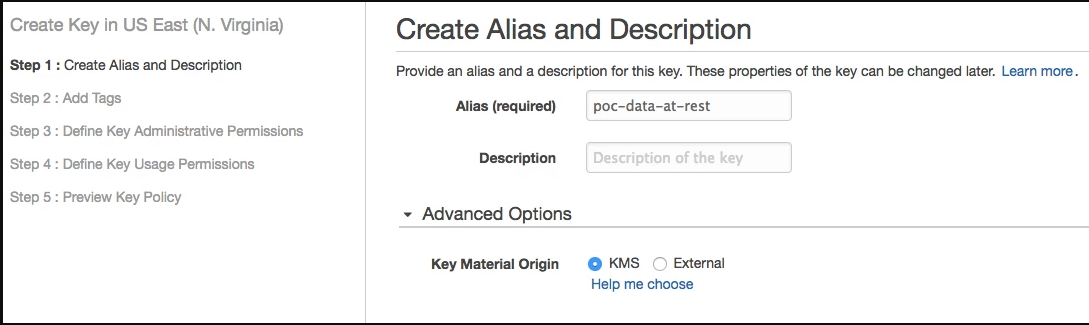
If you don’t have a KMS key, you can create it first:
-
From the IAM console, choose Encryption keys from the navigation pane.
-
Select Create Key , and type in <your-key-alias> **
-
For Step 2 and Step 3 , see https://docs.aws.amazon.com/kms/latest/developerguide/create-keys.html for advice.
-
In Step 4 : Define Key Usage Permissions , select <your-role-name>
-
The role now has permission to use the key.
Encrypt a secret password with KMS and store it in the S3 bucket
Next, use KMS to encrypt a secret password. To encrypt text by using KMS, you must use AWS CLI . AWS CLI is installed by default on EC2 Amazon Linux instances and you can install it on Linux, Windows, or Mac computers.

To encrypt a secret password with KMS and store it in the S3 bucket:

From the AWS CLI, type the following command to encrypt a secret password by using KMS (replace <your-region> with your region). You must have the right permissions in order to create keys and put objects in S3 (for more details, see Using IAM Policies with AWS KMS ). In this example, I have used AWS CLI on the Linux OS to encrypt and generate the encrypted password file.
aws --region <your-region> kms encrypt --key-id 'alias/<your-key-alias>' --plaintext '<your-password>' --query CiphertextBlob --output text | base64 --decode > LuksInternalStorageKey

aws s3 cp LuksInternalStorageKey s3://<your-bucket-name>/LuksInternalStorageKey
The preceding commands encrypt the password (Base64 is used to decode the cipher text). The command outputs the results to a file called LuksInternalStorageKey. It also creates a key alias (key name) that makes it easy to identify different keys; the alias is called <your-key-alias> . The file is then copied to the S3 bucket created earlier in this post.
Configure EC2 with role and launch configurations
In this section, you launch a new EC2 instance with the new IAM role and a bootstrap script that executes the steps to encrypt the file system.
|
The script in this section requires root permission, and it cannot be run manually through an ssh tunnel or by an unprivileged user. |
-
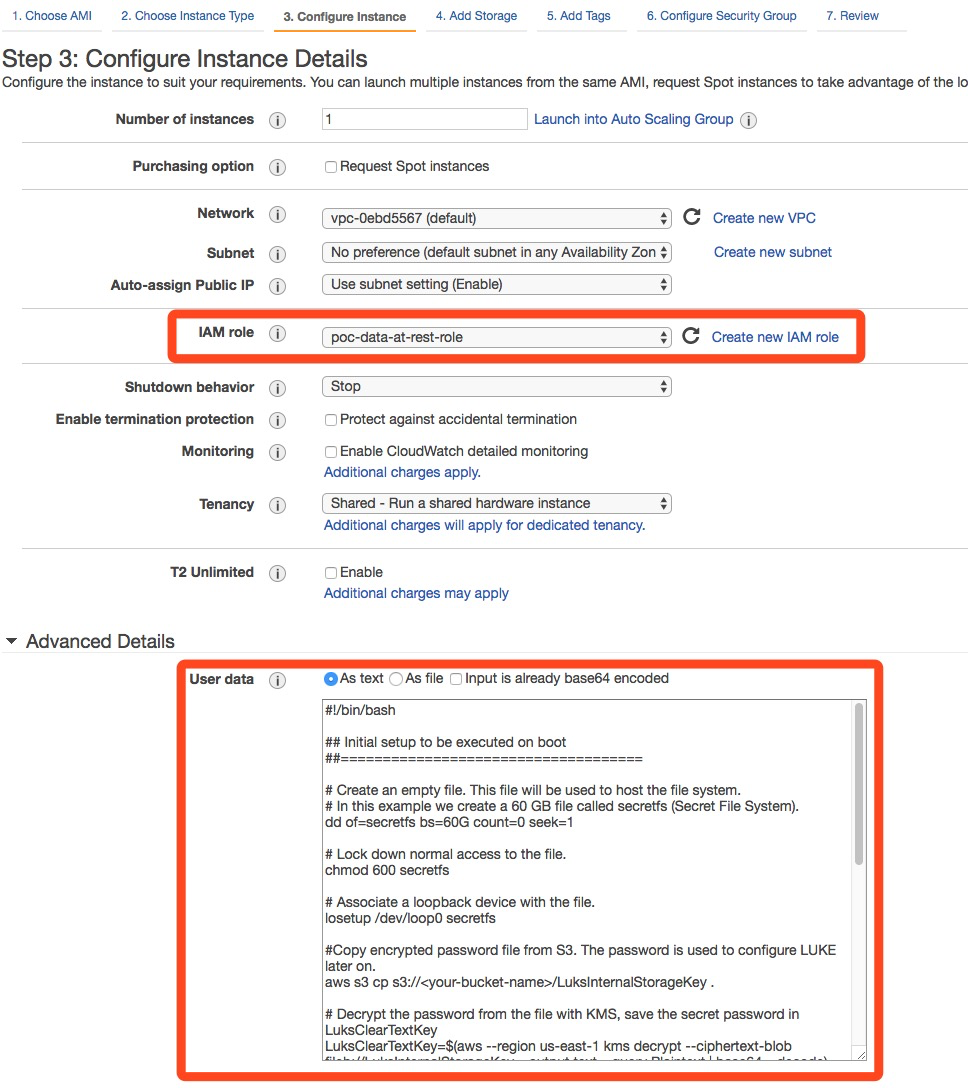
In the EC2 console, launch a new instance (see this tutorial for more details). Amazon Linux AMI 2017.09.1 (HVM), SSD Volume Type (If NOT using Amazon Linux AMI, a script the installs python, pip and AWS CLI needs to be added in the beginning).
-
In Step 3: Configure Instance Details
-
In IAM role , choose <your-role-name>
-
In User Data , paste the following code block after replacing the placeholders with your values and appending TigerGraph installation script
-
#!/bin/bash

db_user=tigergraph

## Initial setup to be executed on boot
##====================================
# Create an empty file. This file will be used to host the file system.
# In this example we create a <disk-size> (for example: 60G) file at <path-to-encrypted-file> (for example: /home/tigergraph/gstore_enc).
dd of=<path-to-encrypted-file> bs=<disk-size> count=0 seek=1

# Lock down normal access to the file.
chmod 600 <path-to-encrypted-file>

# Associate a loopback device with the file.
losetup /dev/loop0 <path-to-encrypted-file>

#Copy encrypted password file from S3. The password is used to configure LUKE later on.
aws s3 cp s3://<your-bucket-name>/LuksInternalStorageKey .

# Decrypt the password from the file with KMS, save the secret password in LuksClearTextKey
LuksClearTextKey=$(aws --region <your-region> kms decrypt --ciphertext-blob fileb://LuksInternalStorageKey --output text --query Plaintext | base64 --decode)

# Encrypt storage in the device. cryptsetup will use the Linux
# device mapper to create, in this case, /dev/mapper/tigergraph_gstore.
# Initialize the volume and set an initial key.
echo "$LuksClearTextKey" | cryptsetup -y luksFormat /dev/loop0

# Open the partition, and create a mapping to /dev/mapper/tigergraph_gstore.
echo "$LuksClearTextKey" | cryptsetup luksOpen /dev/loop0 tigergraph_gstore

# Clear the LuksClearTextKey variable because we don't need it anymore.
unset LuksClearTextKey

# Create a file system and verify its status.
mke2fs -j -O dir_index /dev/mapper/tigergraph_gstore

# Mount the new file system to /mnt/secretfs.
mkdir -p /mnt/secretfs
mount /dev/mapper/tigergraph_gstore /mnt/secretfs

# create user tigergraph
adduser $db_user

# Change the permission so that only tigergraph has access to the file system
chmod -R 700 /mnt/secretfs
chown -R $db_user:$db_user /mnt/secretfs

# Install TigerGraph
# Run the one-command installation script with TigerGraphh root path under /mnt/secretfs
It may take a few minutes for the script to complete after system launch.
Then, you should be able to launch one or more EC2 machines with an encrypted folder under /mnt/secretfs that only OS user tigergraph can access.