Design Schema
Design Schema
GraphStudio supports modifying multiple graphs within one TigerGraph instance. Read more about Multigraph at MultiGraph - An Overview.
Designing the graph schema is the first and most important step of solving a business problem. The graph schema is the model of the problem, and all the subsequent steps depend on the graph schema.
|
Only certain roles have the privilege to modify a graph schema.
|
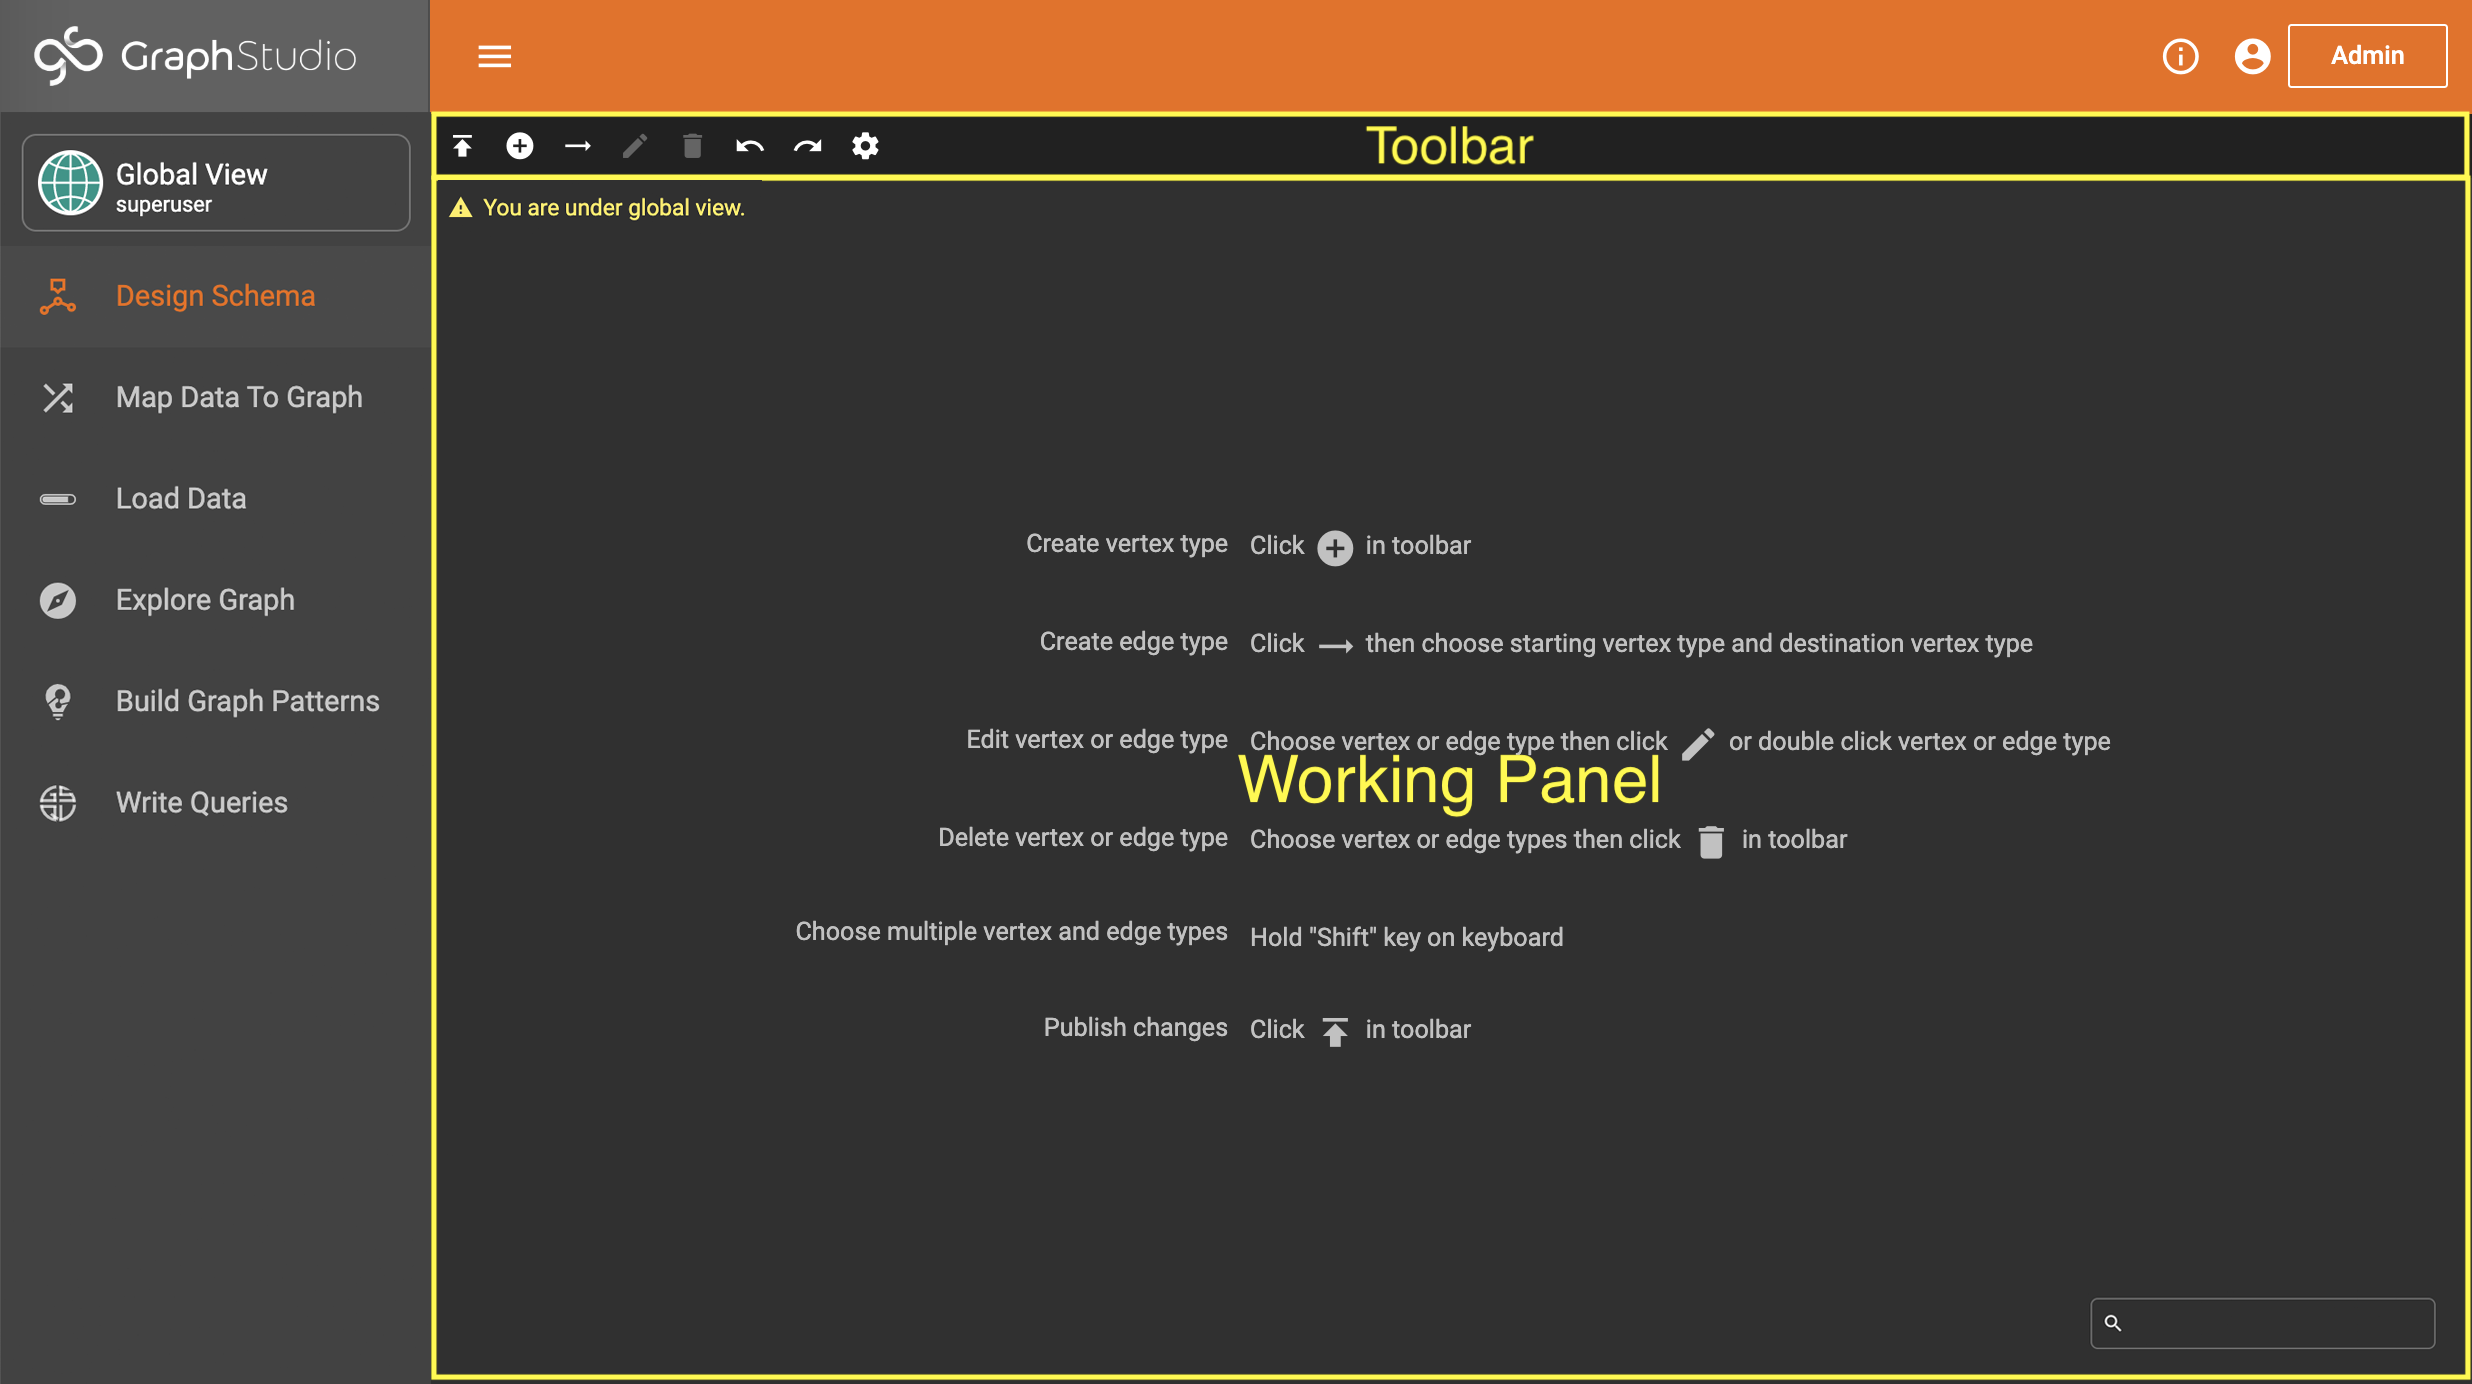
When there is no graph schema in the system, this page will show some hints:
Otherwise this page will visualize the schema:
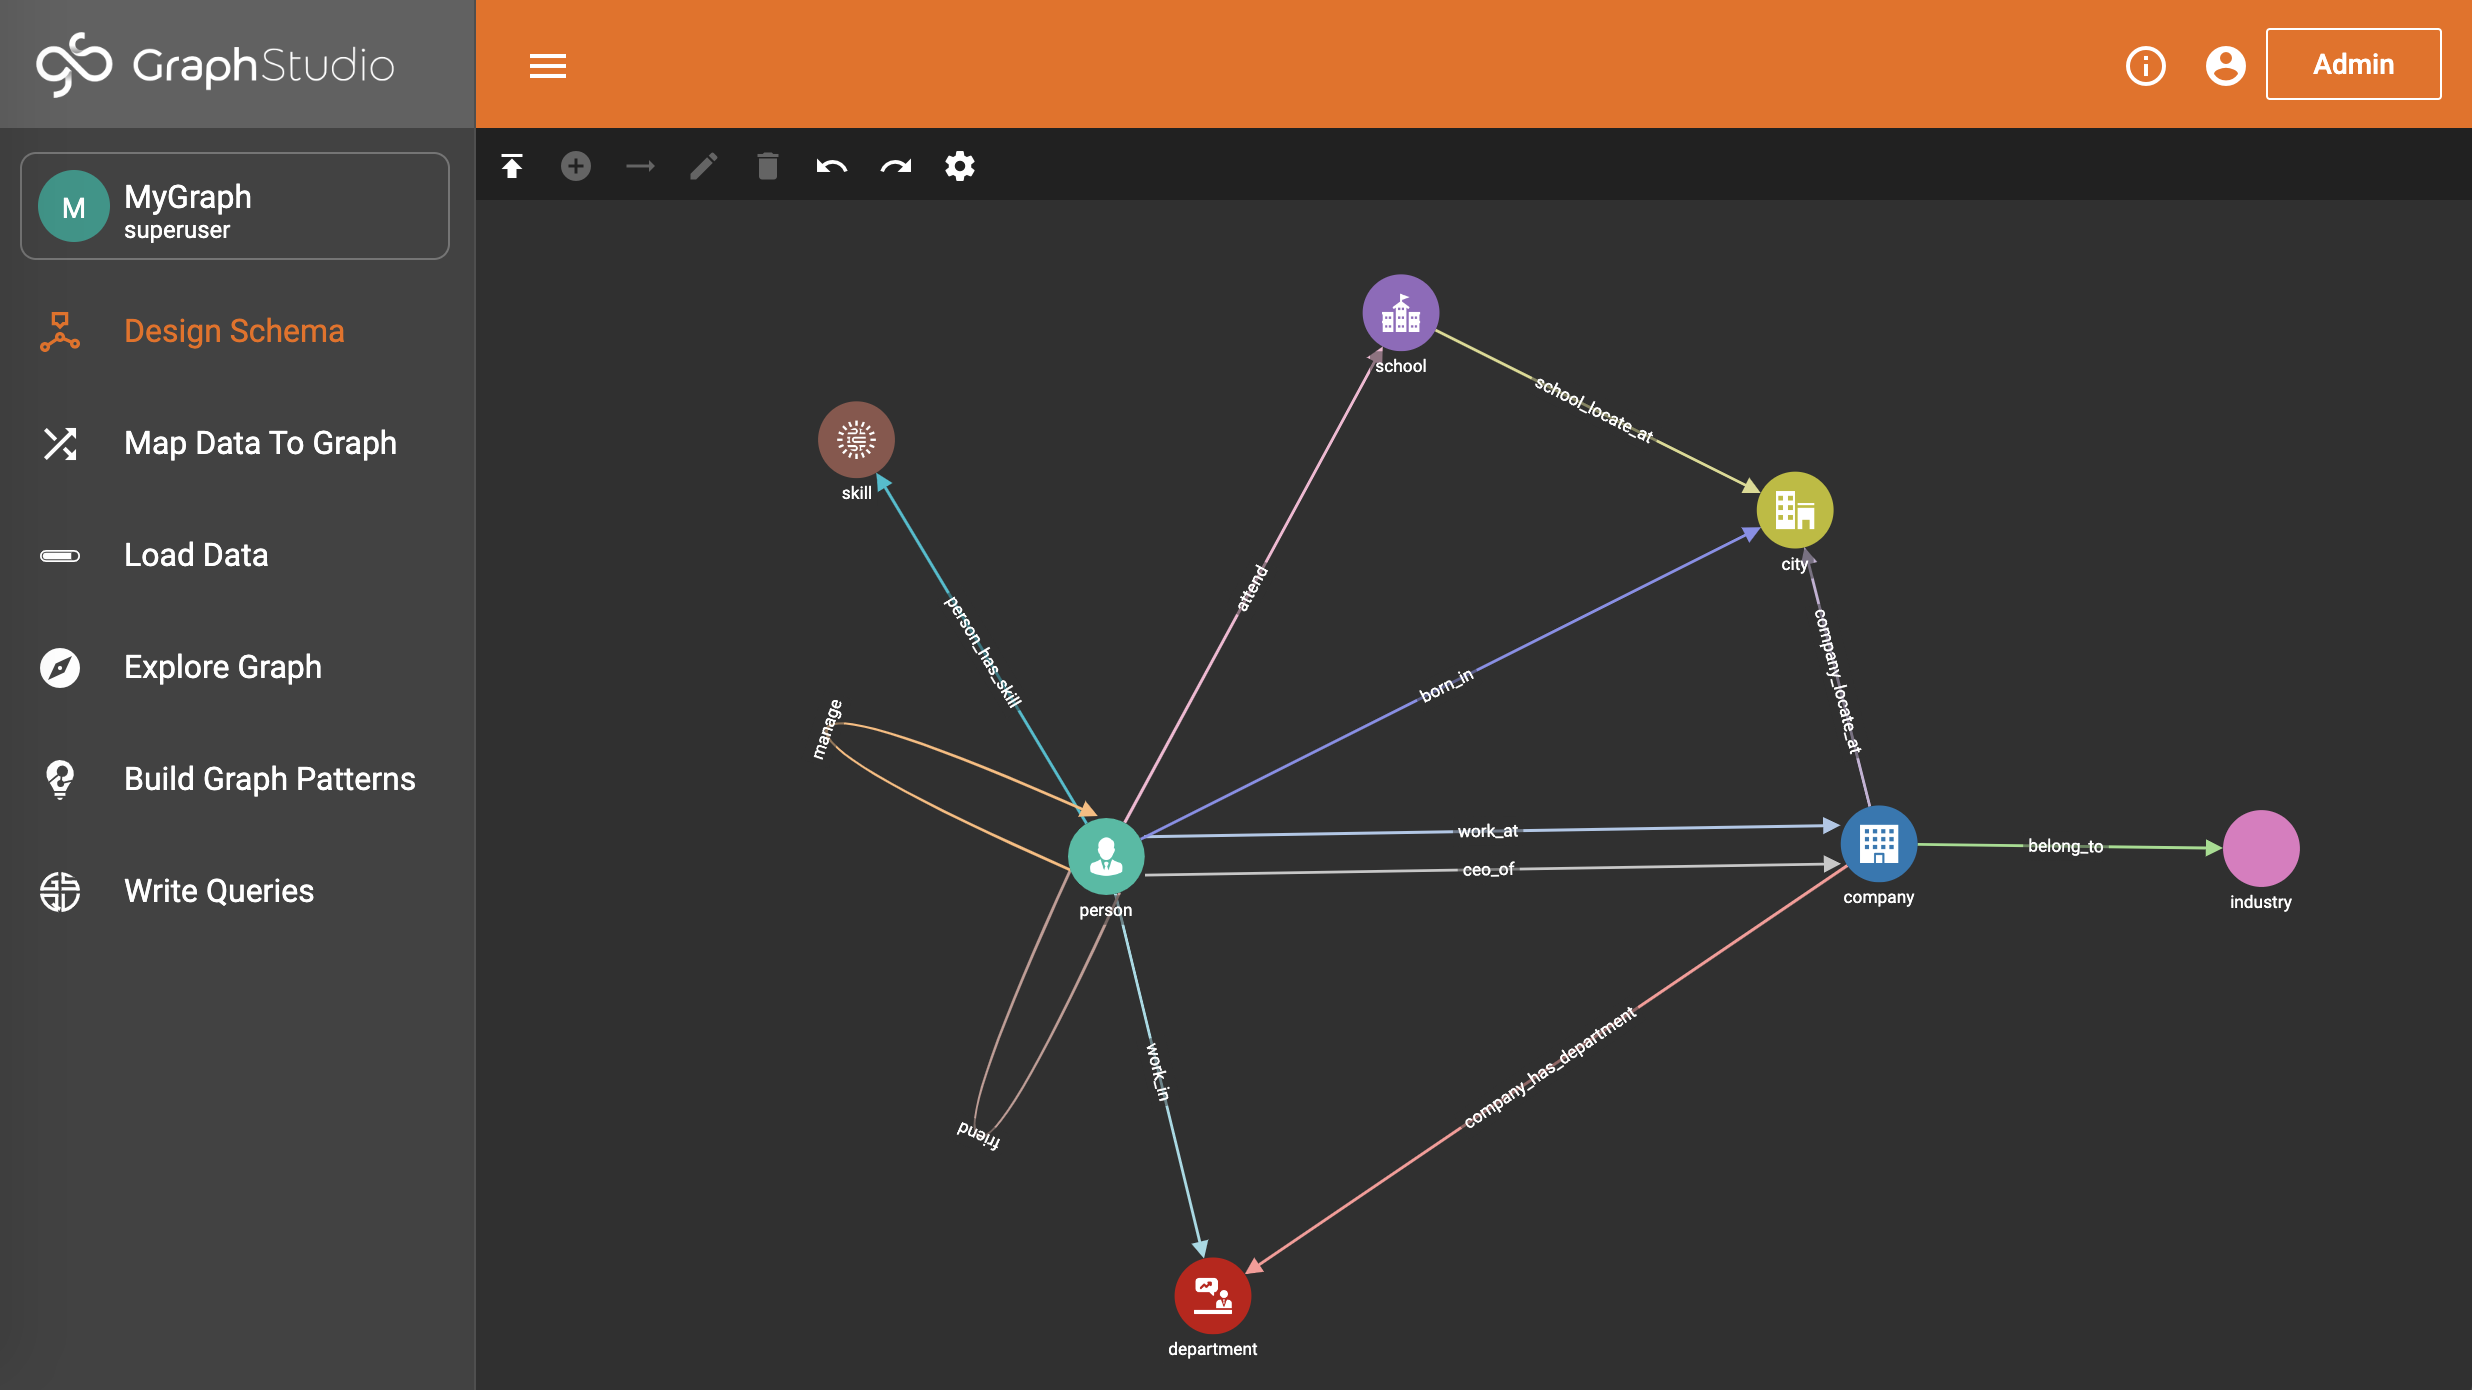
Each circle represents a vertex type, and each link represents an edge type. You can drag the circles to change their positions and zoom in or out by scrolling.
| The relationship between a vertex type and a vertex instance of a graph is like the relationship between a table and one record of a table in the relational database world. The relationship between an edge type and an edge instance is similar. In the Design Schema step, the user defines vertex types and edge types to model the data schema. After the schema has been created, the next two steps, Map Data To Graph and Load Data, are for loading data into the graph. |
Global View vs. Graph View
The superuser and globaldesigner roles can modify global vertex and edge types under Global View. Under global view, the toolbar area only contains "Publish schema", "Add a vertex type", "Add an edge type", "Edit", "Delete", "Undo" and "Redo" buttons. There will be a warning message in the working panel saying user is under global view.

|
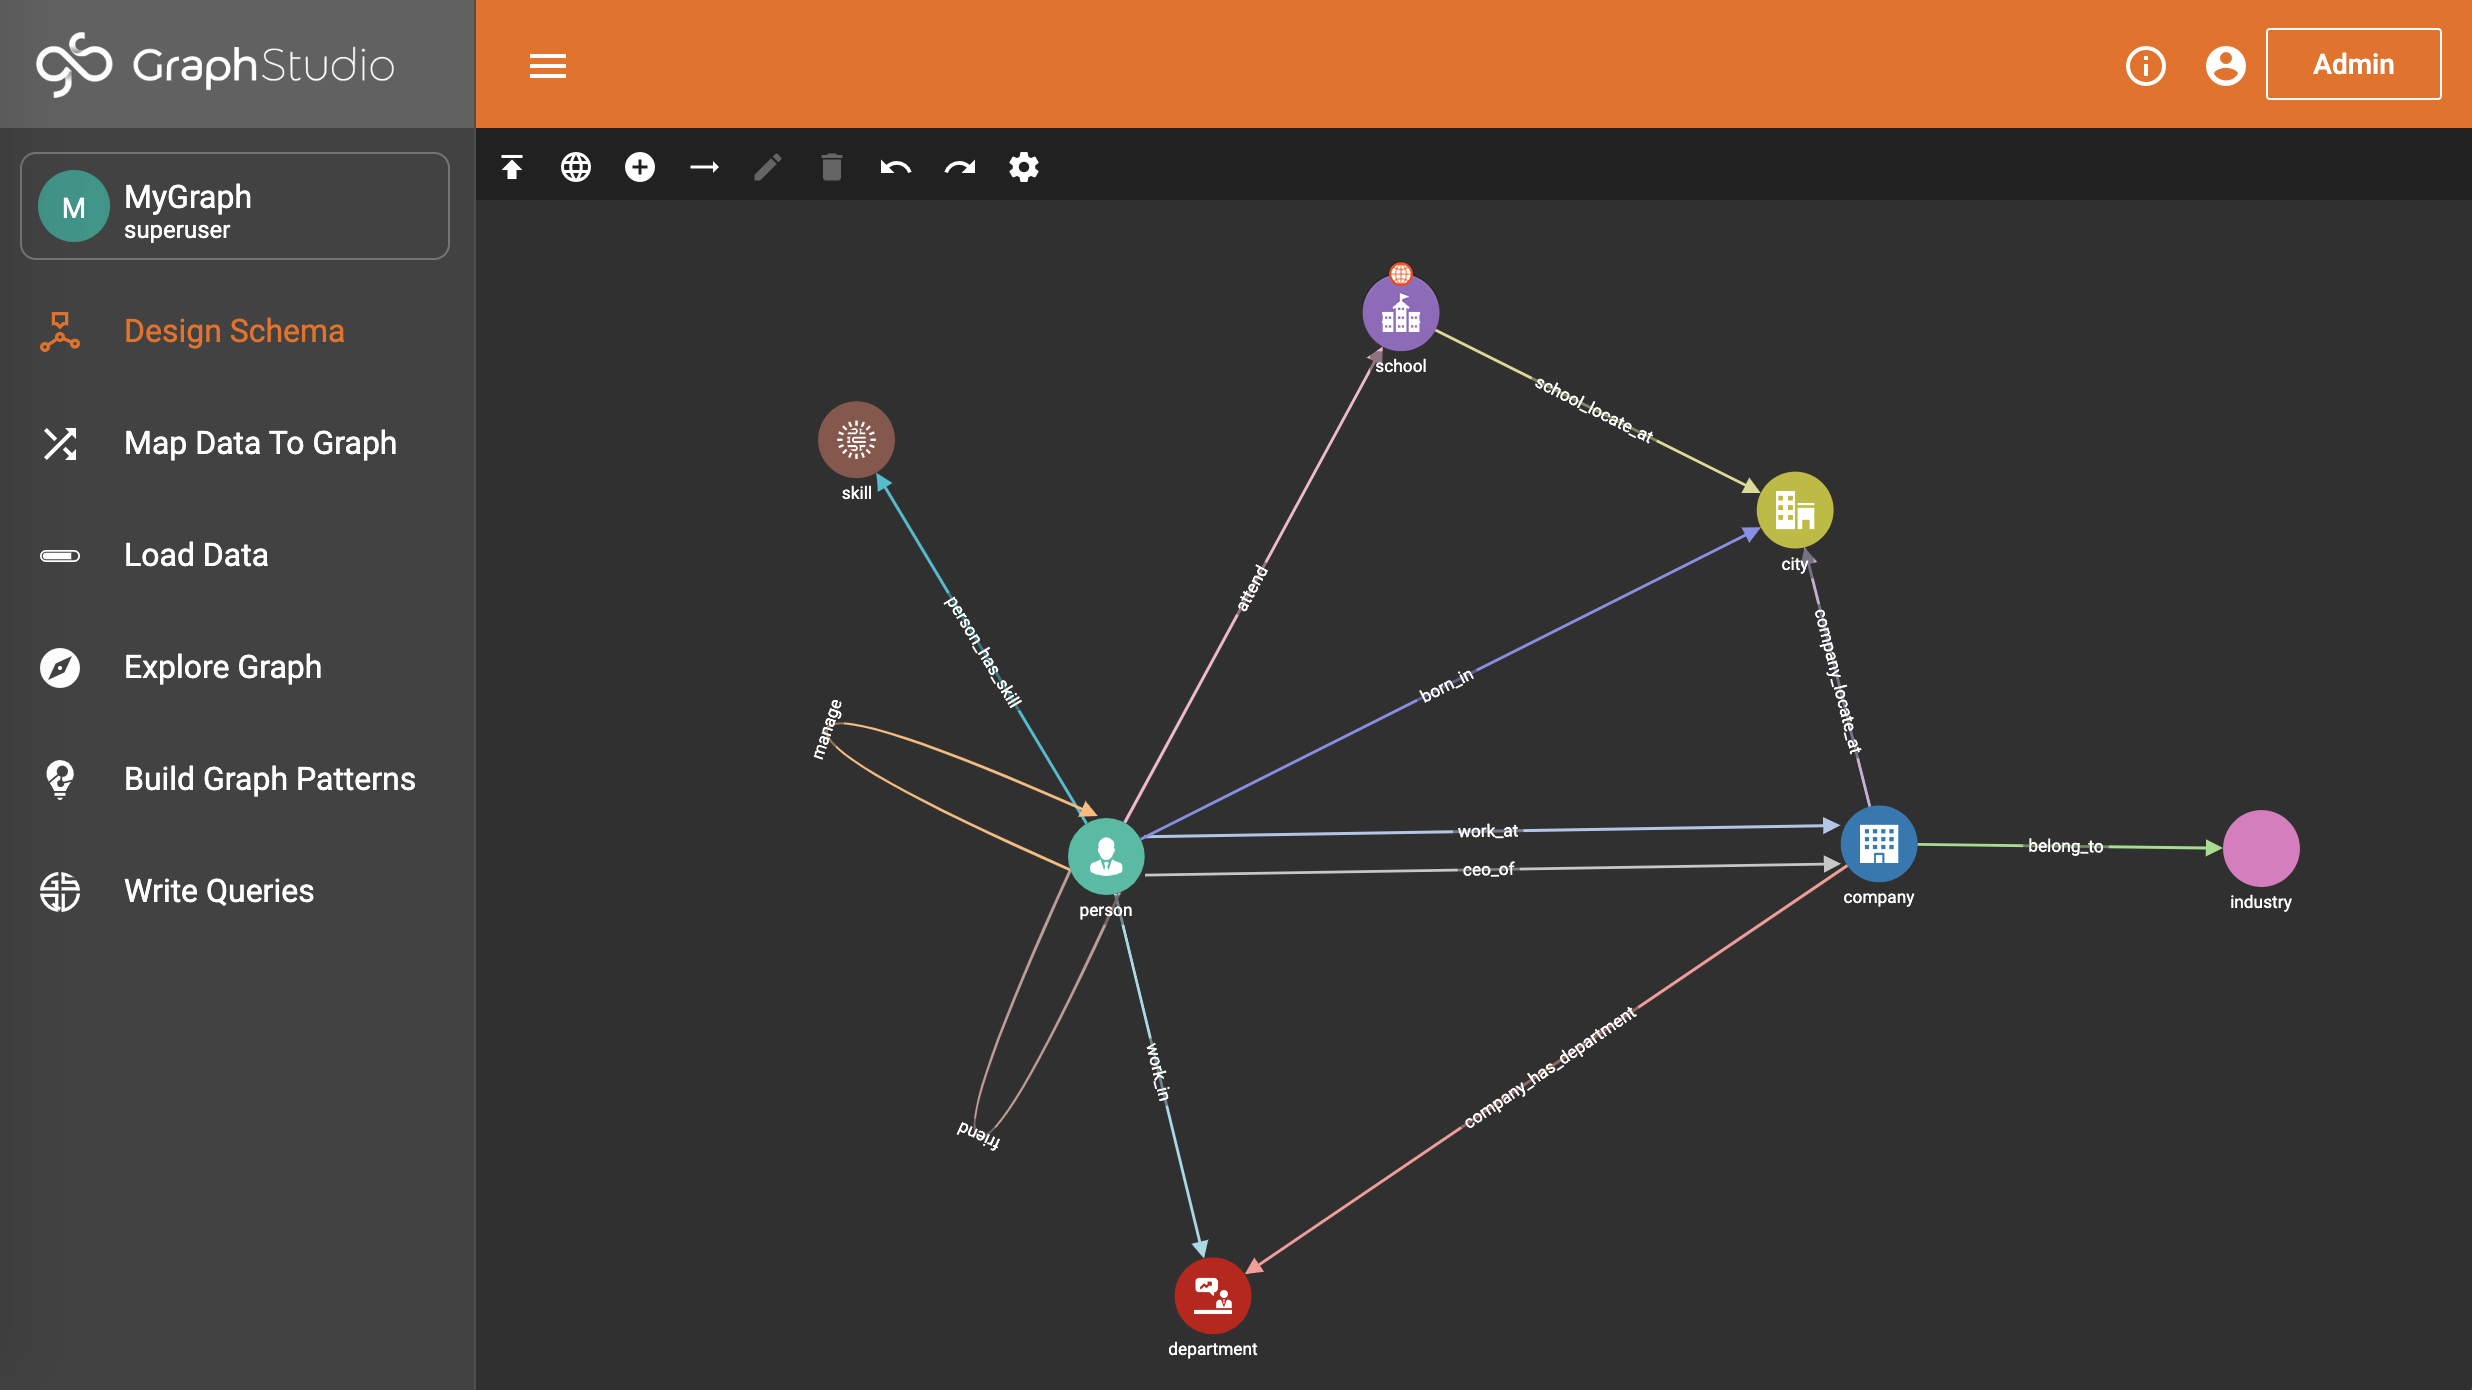
Users can modify a graph schema under graph view. In a graph, there is one more in the toolbar area - "View global vertex and edge types". And for global vertex and edge types used in a graph, a little global icon is attached to them.
Add A Vertex Type
Click the add vertex type
button  to add a
vertex type. The working space will enter Add Vertex mode and the button
color will change to
green
to add a
vertex type. The working space will enter Add Vertex mode and the button
color will change to
green  . Click
the button again to exit Add Vertex mode. The add vertex type panel in
the right:
. Click
the button again to exit Add Vertex mode. The add vertex type panel in
the right:
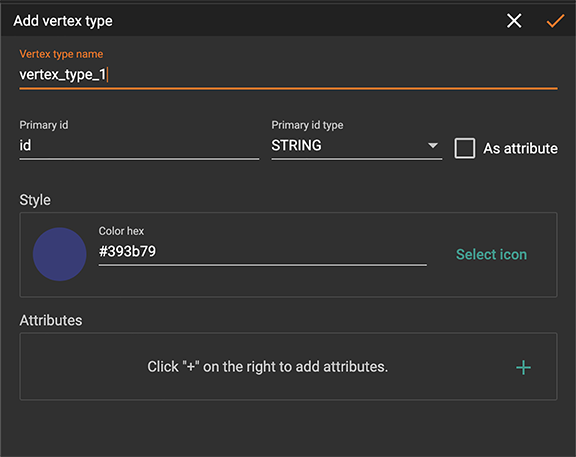
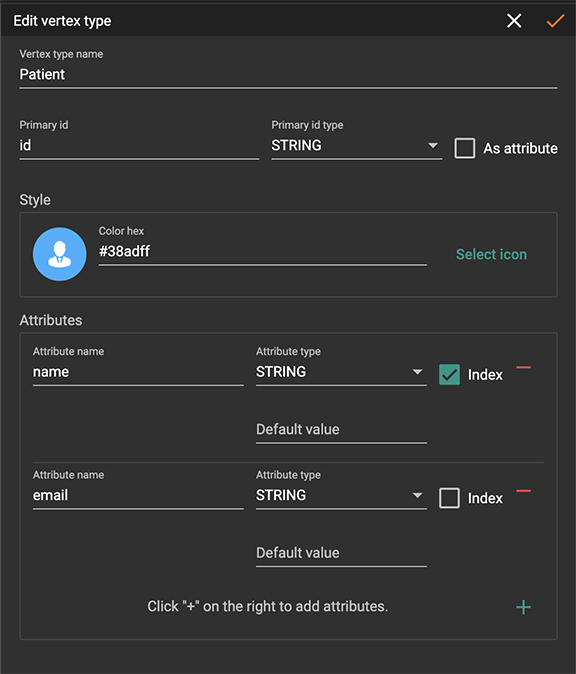
In this window you specify a vertex type name and primary id name. GraphStudio will automatically select a color for your vertex type icon.
In the Style section, you can change the color of your vertex icon. You can also replace the default circle using a file that you upload or choose from our icon library.
Adding and Deleting Attributes
If you want to have a vertex or edge type’s primary ID as an attribute, check the "AS ATTRIBUTE" box. This will allow you to use the vertex or edge’s primary ID like any other attribute of the vertex or edge type in features such as filter, attachment and order.
To add an attribute, click the green plus sign at the right of the Attributes section:
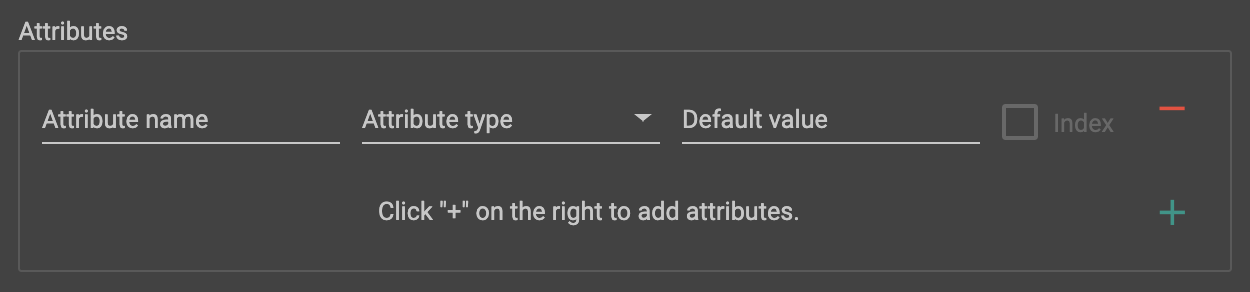
Provide a name and data type for your new attribute. Optionally, you can specify a default value for the attribute. (If you do not specify, every data type has a system default value. For example, the default value for an integer is 0.)
For some types of attributes (INT, UINT, STRING, STRING COMPRESS, DATETIME), you can add an index, which will improve query performance when accessing these attributes.
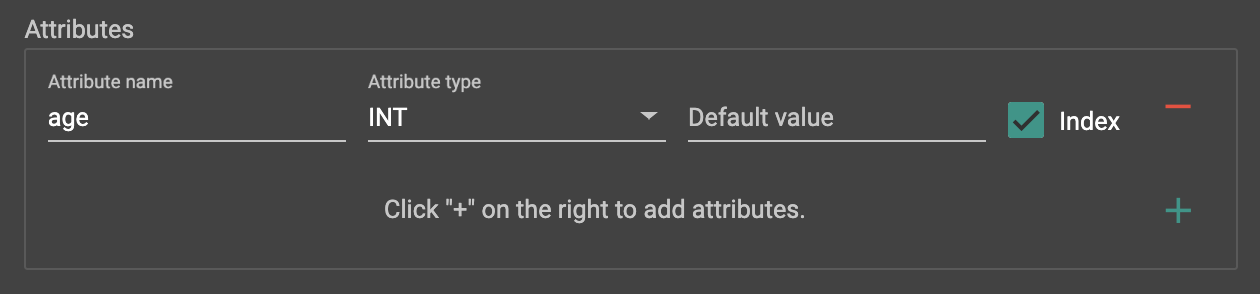
Click the red minus sign to the right of the attribute to delete an existing attribute.
Once you are satisfied with the vertex type settings, click the checkmark button at the top to add the vertex type. A new circle will appear in the working panel. You can drag the circle to any desired position.
PRIMARY KEY and composite keys are not supported in GraphStudio. If you define a vertex type using the PRIMARY KEY syntax or with composite key, you will not be able to operate on the graph with that vertex type or the global schema in GraphStudio.
|
Add An Edge Type
Click the add edge type button  to enter Add Edge mode and add an edge
type.
to enter Add Edge mode and add an edge
type.
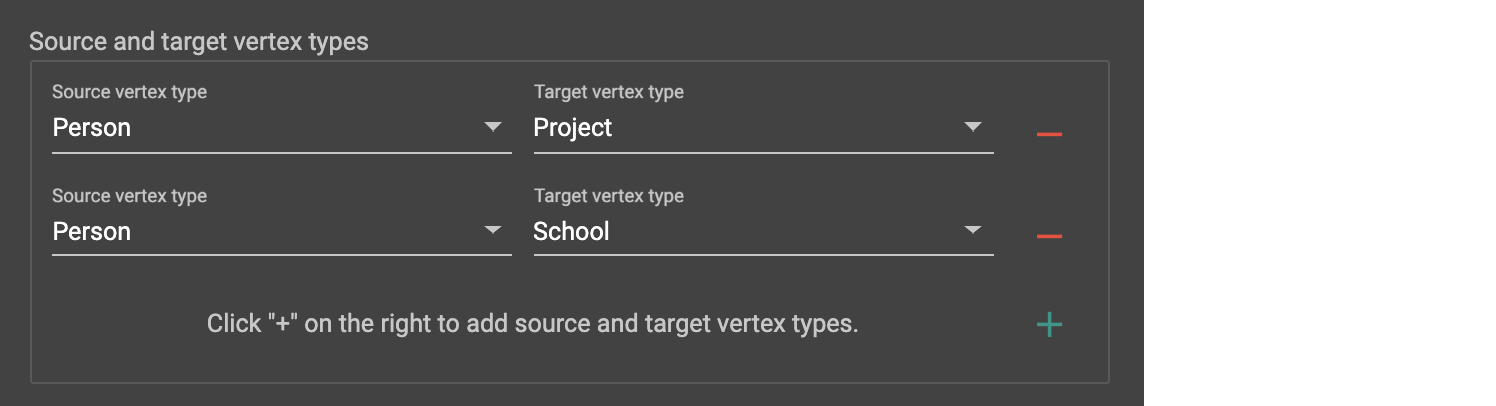
Each edge type has one or many source vertex types and target vertex types. First, click the source vertex type. A hint will appear on the vertex type circle:

Then click the target vertex type. The add edge type panel will appear to the right:
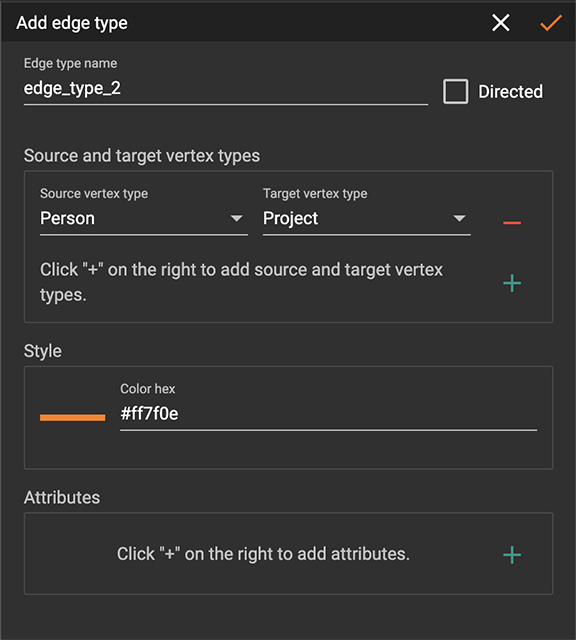
You must specify an edge type name. The source vertex type and target vertex type are selected based on your clicking action. However, you can change that by choosing another vertex type in the dropdown list.
You can also click the green plus sign at the right of the source and target vertex types section to add more source and target vertex types of the edge type.
By default, the edge type is undirected. To make the edge type directed, mark the Directed checkbox:
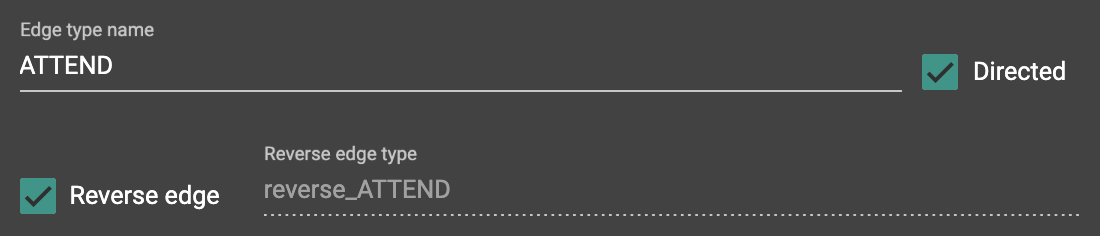
If Directed is checked, another checkbox will appear for you to choose whether the edge type should include reverse edges. Including reverse edges provides more flexibility when designing queries.
Unselect the reverse edge checkbox ONLY IF your machine memory is very tight, because if there is no reverse edge, queries will not be able to traverse backwards along this directed edge type from the target vertex to the source vertex.
Editing edge type attributes is the same as editing vertex type attributes.
Once you are satisfied with the edge type settings, click the checkmark button at the top to add the edge type, which will instantly appear in the working panel.
You can add multiple edge types between the same source vertex type and target vertex type pair. Moreover, an edge can use the same vertex type for both its source vertex type and its target vertex type, e.g., a Friendship edge from a Person vertex to Person vertex.
Edit Vertex Or Edge Type
You can edit the vertex types or edge types at any time after you add
them. Click one vertex type circle or one edge link, then click
the edit button  or double-click on the selected vertex or edge.
working space will enter Edit mode, allowing you to use the Edit Attributes panel to make the same kinds of changes as in the Add panel.
or double-click on the selected vertex or edge.
working space will enter Edit mode, allowing you to use the Edit Attributes panel to make the same kinds of changes as in the Add panel.
After making your changes, click the checkmark button at the top to confirm your changes and update the graph.
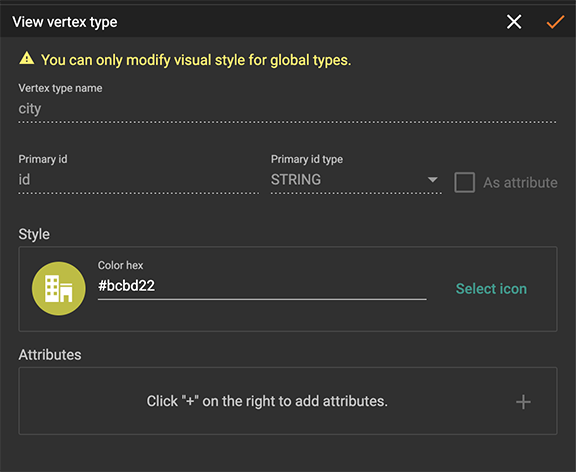
In graph mode, you can only edit the style of a global vertex or edge type:
Delete Vertex Or Edge Type
You can delete a vertex type or an edge type by first choosing the
vertex type circles or edge type links, then clicking the delete
button  . In order to
delete multiple vertex types and edge types, hold down the "Shift" key
while you select multiple items.
. In order to
delete multiple vertex types and edge types, hold down the "Shift" key
while you select multiple items.
| Note that user cannot delete a global vertex or edge type using the delete button in a graph. |
Undo and redo
You can undo and redo your changes with the undo and redo buttons:  .
history since the time you entered the Design Schema page is recorded.
.
history since the time you entered the Design Schema page is recorded.
View global vertex and edge types
Click the view global vertex and edge types
button  to
assign global vertex and edge types to a graph, or drop them from a
graph. The working space will enter View Global Vertex and Edge Types
mode.
The add vertex type panel will appear to the right:
to
assign global vertex and edge types to a graph, or drop them from a
graph. The working space will enter View Global Vertex and Edge Types
mode.
The add vertex type panel will appear to the right:

| Only a superuser or globaldesigner can modify global types in a graph. The view global vertex and edge types button will be disabled for other users. |
Publish schema
Once you are satisfied with the graph schema, click the publish schema
button  to publish the
schema to the TigerGraph system. If you are publishing a brand new
schema, a progress bar will appear:
to publish the
schema to the TigerGraph system. If you are publishing a brand new
schema, a progress bar will appear:

Change or edit an existing schema
If a schema already exists, Publish Schema will modify the existing schema.
|
If you have already loaded data into or created queries for an existing graph, Publish Schema will only retain your existing data in some circumstances. |
If the change to a vertex or edge type is to add or remove attributes or attribute indexes, GraphStudio will employ a GSQL SCHEMA_CHANGE job and retain any graph data you already loaded.
For all other types of changes, including:
-
renaming a vertex or edge type
-
changing attribute name or data type
-
changing edge direction
-
adding or removing a reverse edge
GraphStudio will remove the old vertex or edge type and add the new one with your desired configurations. In that case, the loaded data to that vertex or edge type will be erased.
| If a vertex type will be removed in order to change the schema, all edge types connected to that vertex type will also be removed. |
When you are editing a graph schema, a warning message in the top-left side of the working panel will show which old vertex and edge types will be removed. Make sure to check the message periodically to make sure it is as you expect:

Finally, when you click publish schema
button , a pop up
window will summarize your changes to the schema. The vertex and edge
types that will be removed are highlighted. Make sure you confirm the
changes before continue:
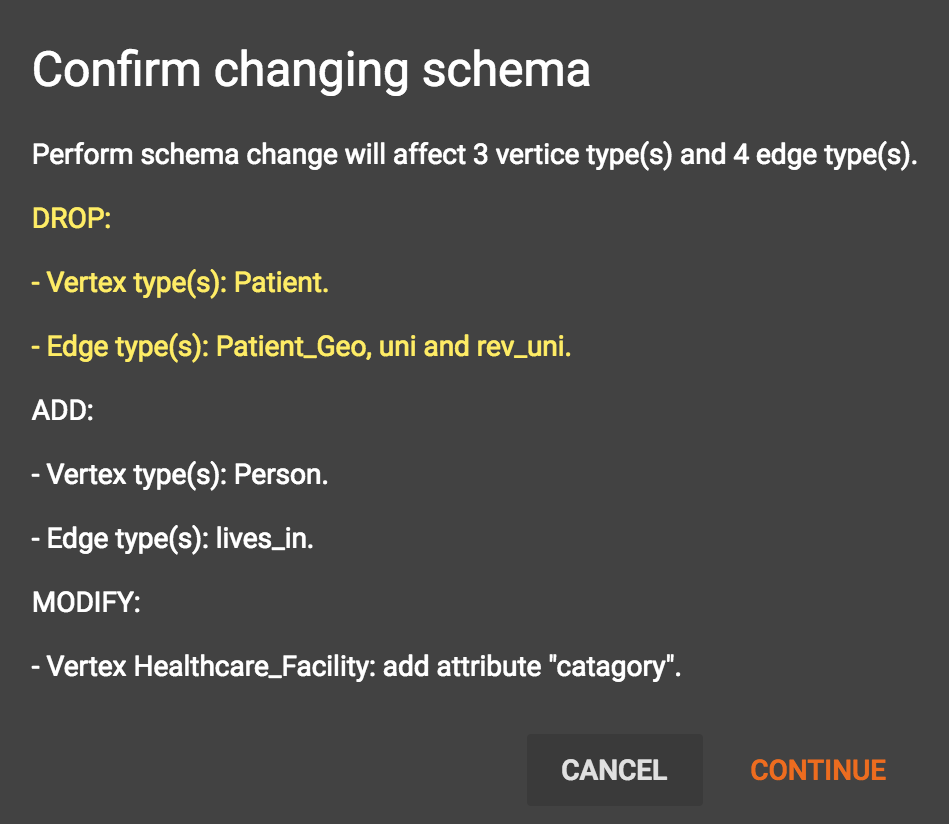
Click continue button, and GraphStudio will start changing your schema:

If you have already created a data mapping and written queries, GraphStudio will try its best to preserve your work when you publish your modified schema:
-
All your queries will be saved as query drafts, so you can install the queries again after you change your schema. If a query has a conflict with the new schema (e.g., referring to a vertex type that is deleted), you need to fix it before installing the query.
-
GraphStudio will migrate your data mapping based on your changes to the schema. Since GraphStudio records your whole operation history, the migration is smart enough to cover most cases. The basic migration rules are the following:
-
Rename vertex types and edge types
-
Remove mappings to deleted vertex types and edge types.
-
Remove mappings to deleted or modified attributes.
-
New vertex types, edge types and new attributes won’t be mapped.
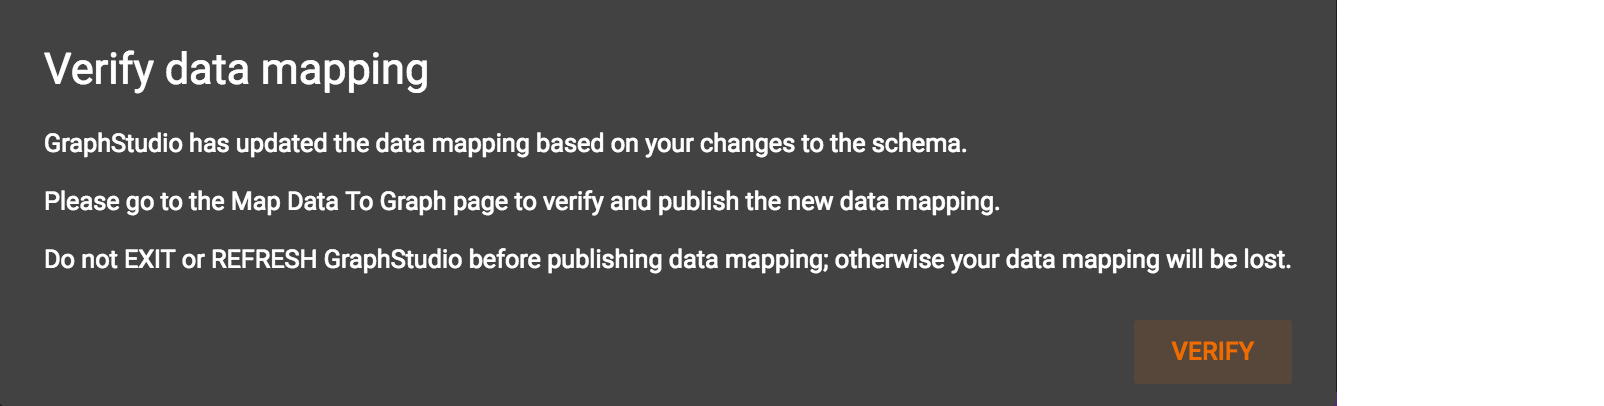
-
After the schema is successfully published, GraphStudio will instruct you to go to the Map Data To Graph page to verify and publish the revised data mapping. If any mapping is not correct, you can fix it. You must publish the migrated data mapping; otherwise, it will be lost.
-
If you have published some data mapping through GraphStudio, then after schema is changed successfully, a pop up window will guide you to go to the Map Data To Graph page to confirm and publish the migrated data mapping: