Data Transformation
GraphStudio gives you access to both a set of built-in functions and user-defined token functions to preprocess data file tokens before loading them in to the graph.
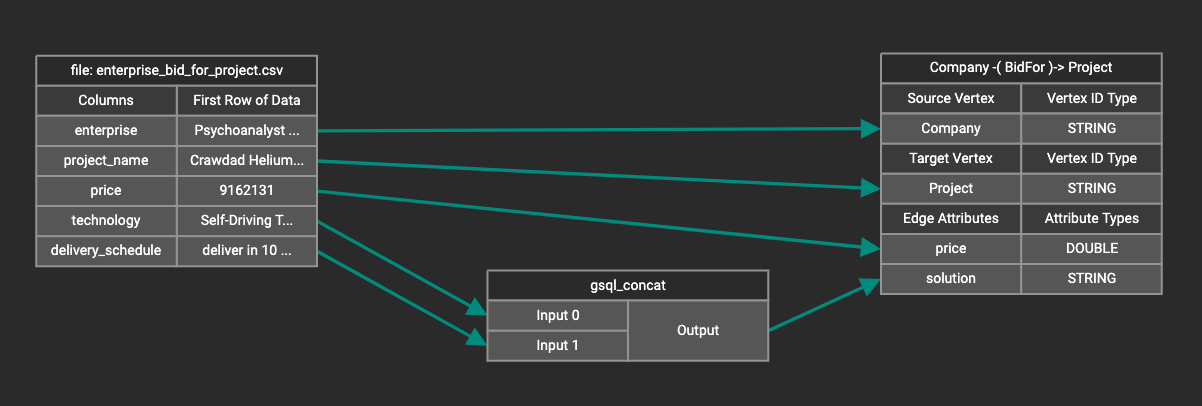
For example, you can concatenate two columns in the data file and load them as an attribute.
This section describes how to use these token functions, as well as other advanced features such as data filtering during loading and mapping data to a Map type attribute.
Using a Token Function
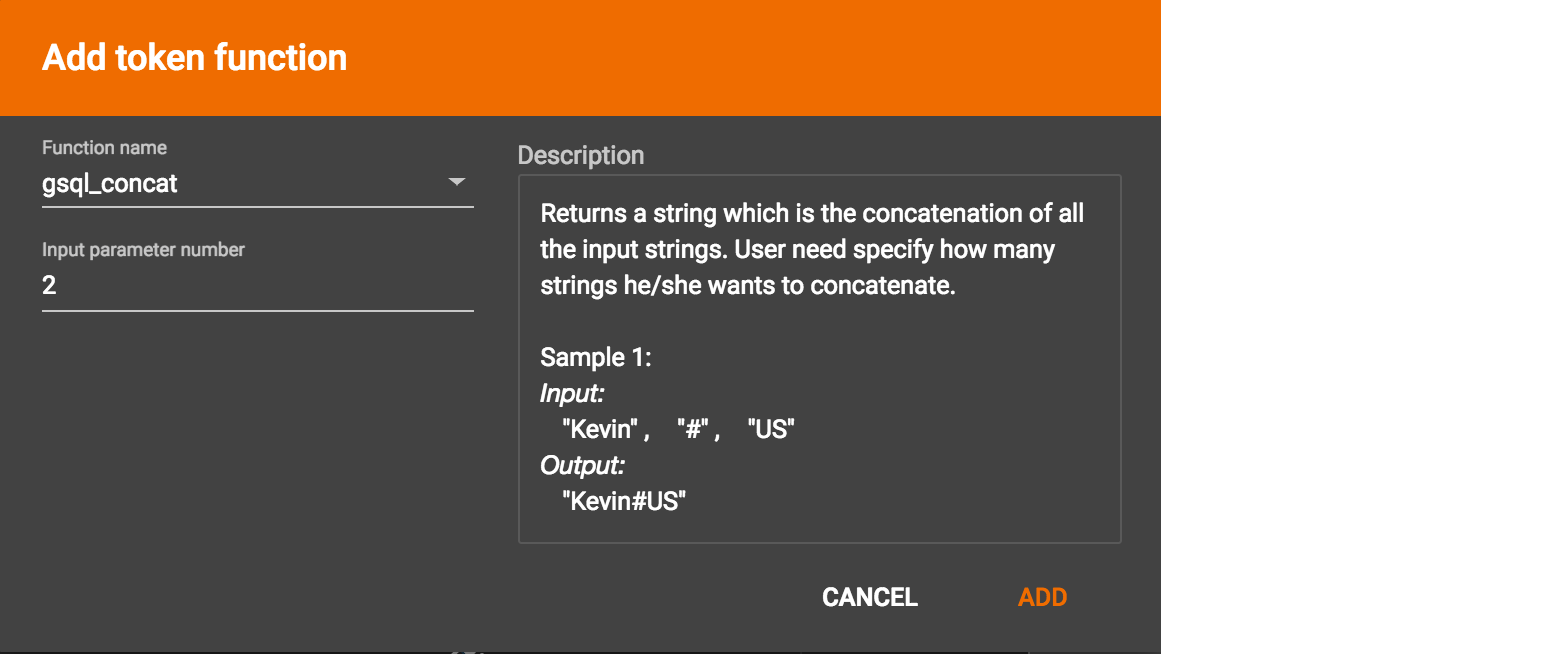
Click the add token function button  to open the Add Token Function window. Select a token function from the drop-down list under Function name, then click the btn:[ADD] button.
For some functions, you may also specify the number of input parameters.
Most token functions have a fixed number of input parameters. In this example, gsql_concat can accept any positive number of inputs.
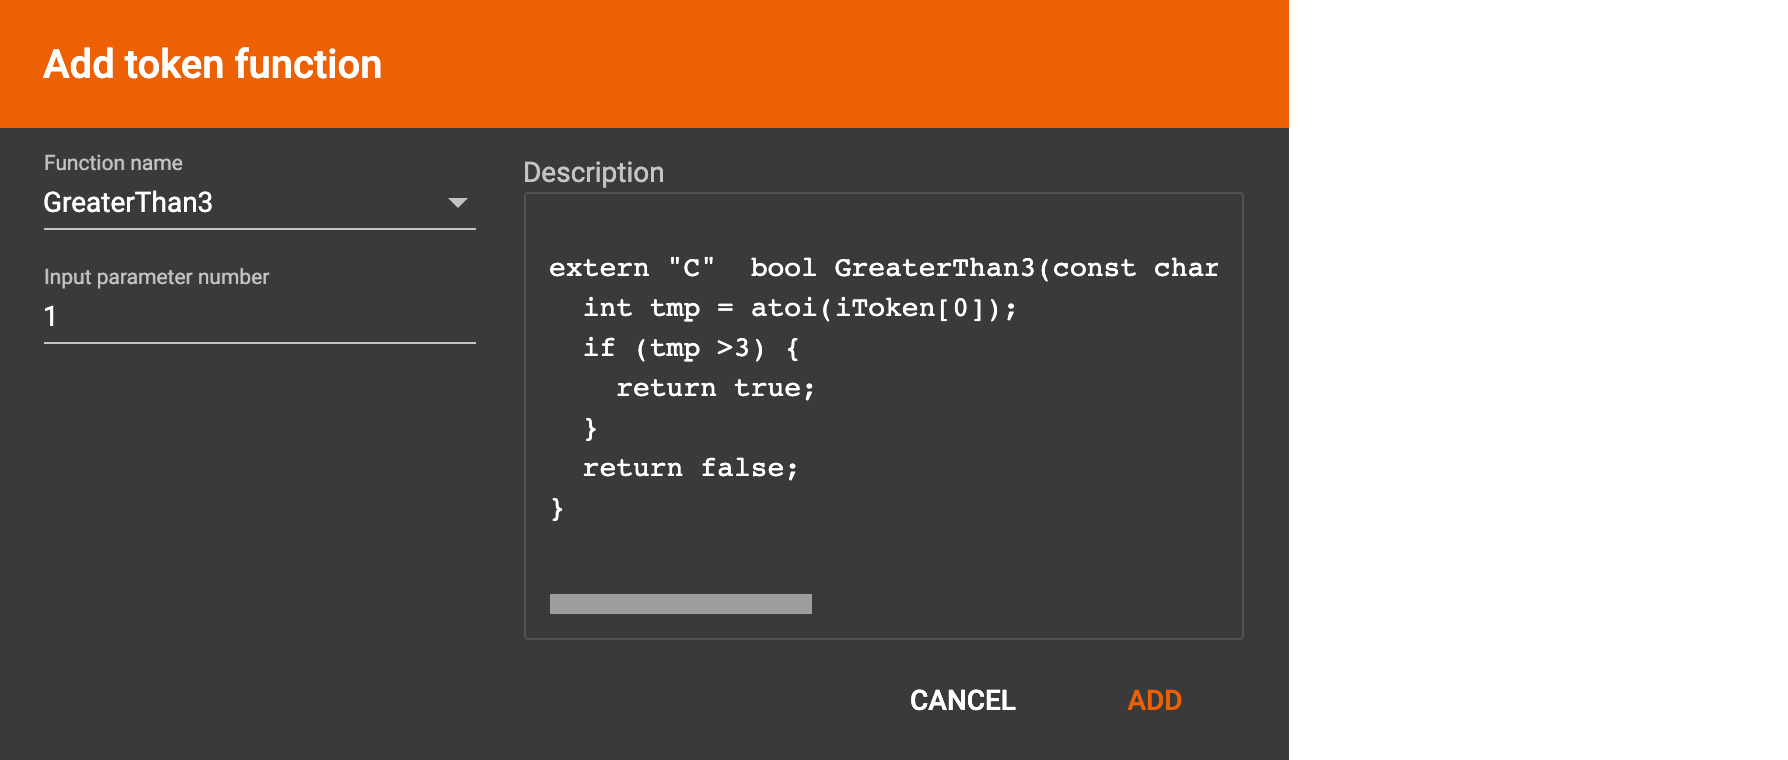
GraphStudio currently does not support creating new user-defined functions. If a user-defined function has been added via the GSQL interface, it will be listed here. To use a user-defined token function, you must manually specify the number of input parameters. The C++ code is shown in the Description section for your reference:
A token function table will be added to the attribute mapping panel.
Token functions act as intermediate steps in the mapping. Create mappings from the data file table to the token function table, and then from the token function table to the vertex/attribute table.
Map a constant value to an attribute or token function input
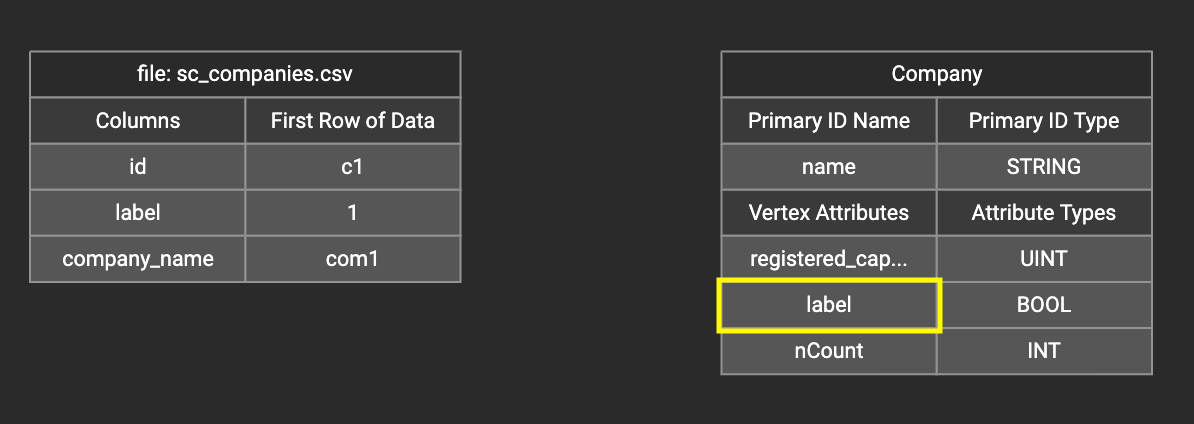
Sometimes, a user may need to load a constant value to an id or attribute. Here we show how to do this in GraphStudio.
Loading a constant to an attribute
In the right working panel, double-click on the target id or attribute in the left column of the right table. In this example, the attribute "label" has been double-clicked:
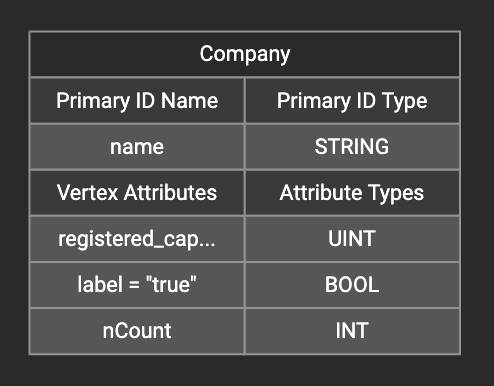
This will cause the Load Constant window to pop up. Type in the constant value and click btn:[Add] to apply the mapping.

After adding the constant value, the attribute’s label will change to id/attribute = "(your valid input value)" .
To modify or remove a constant mapping, double-click the id/attribute again. In the Load Constant window, enter the new value, or erase the value if you want to remove the mapping. Click btn:[Add] to apply your changes.
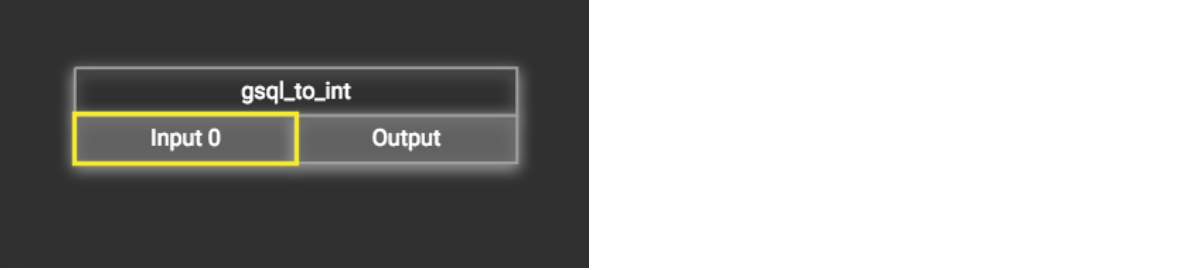
Use a constant input for a token function
First add the token function. Then double-click on the target input (in the left column of the token function table). In the example below, "Input 0" has been double-clicked.
This will cause the Load Constant window to pop up. Type in the constant value and click the Add button to apply the mapping. After adding the constant value, the input’s label will change to Input = "(your input value)" .
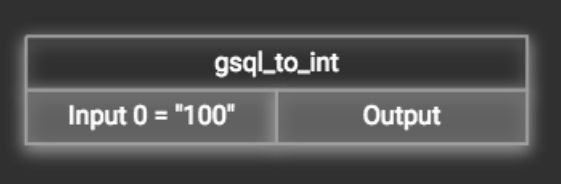
The constant value can be modified or removed by double-clicking the label and editing the value in the Load Constant window.
Add data filter
You can add a data filter to a data mapping so that only data records which meet conditions that you specify will be loaded into the graph.
This is equivalent to the WHERE clause in a GSQL load statement.
You can add one data filter for each data mapping from a data file to a vertex type or edge type, and the data filter only applies to that one mapping. Consider this data mapping:
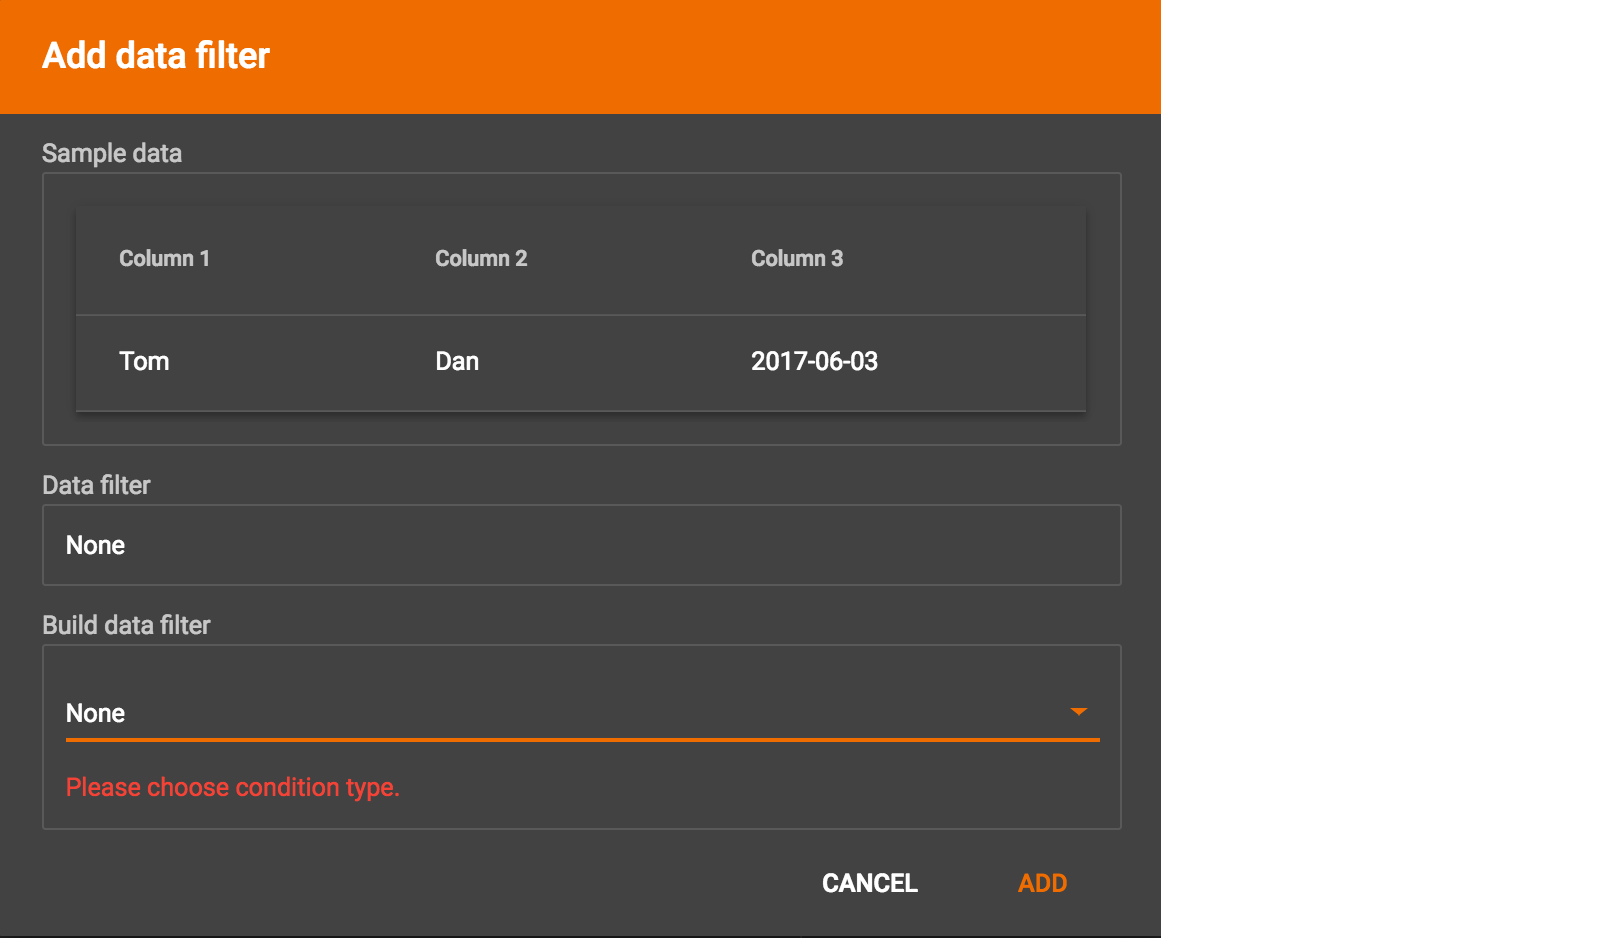
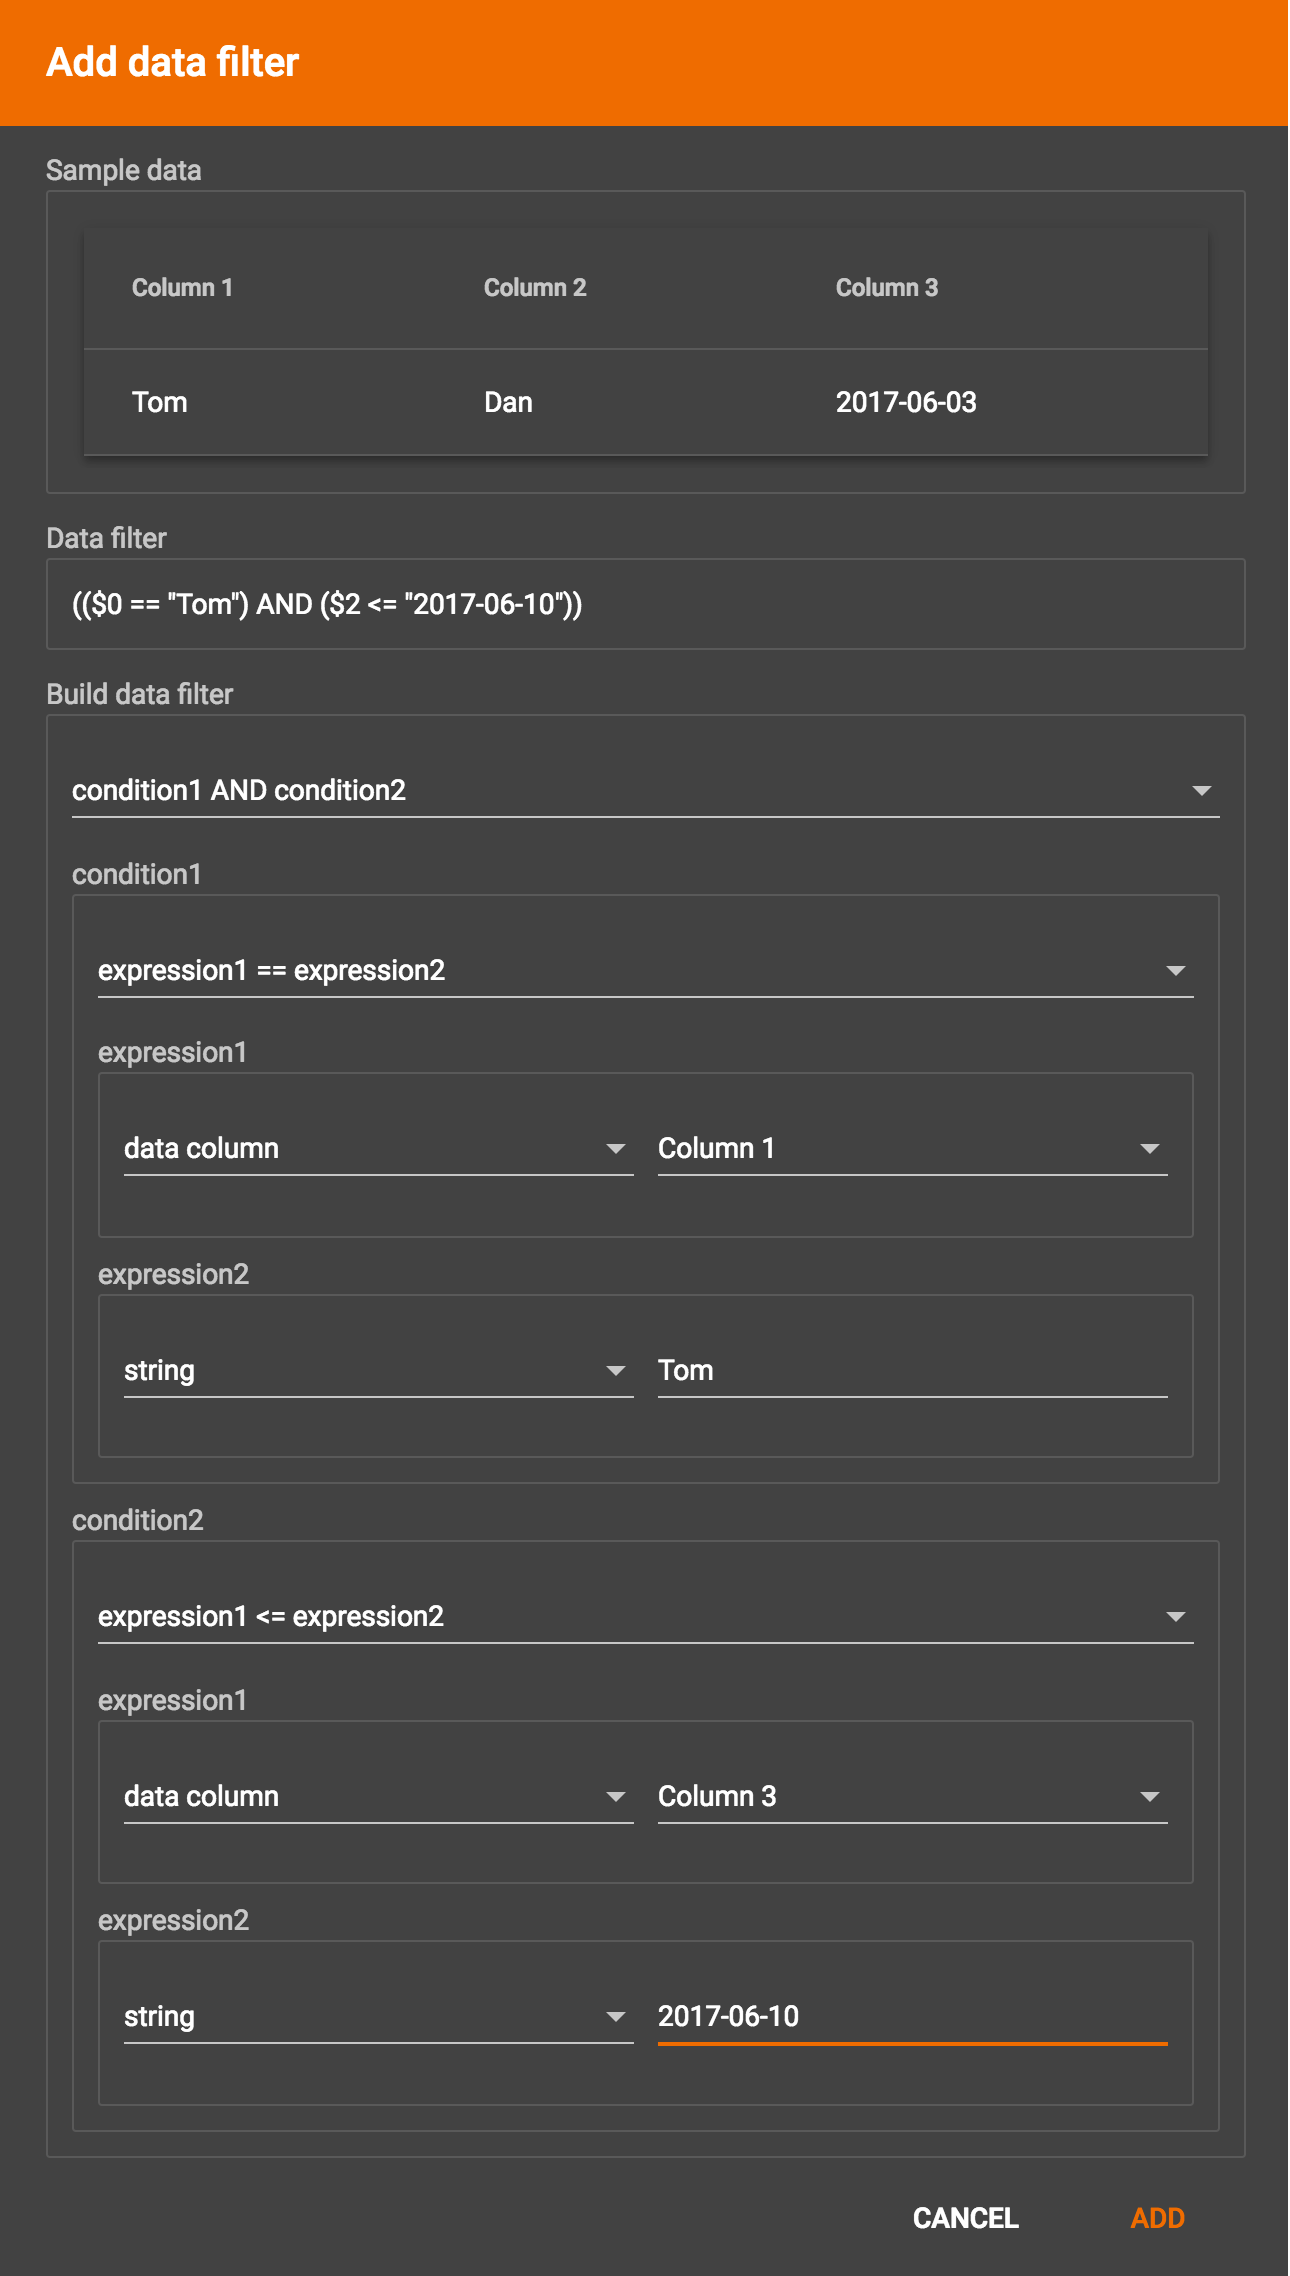
By default, there is no data filter. Click the Data Filter button %20(1)%20(2).png) to start creating a data filter. The Add Data Filter window will appear. The window contains three parts:
to start creating a data filter. The Add Data Filter window will appear. The window contains three parts:
-
The top section shows one row of sample data from your file, as a handy reference to the file’s contents.
-
The middle sections shows what the data filter looks like when it is converted a to GSQL WHERE clause. For more details, see the WHERE Clause section in the GSQL Language Reference Part 1 - Defining Graphs and Loading Data
-
The bottom section is where you define your data filter. The data filter will be converted to a GSQL WHERE clause and shown in real time.
A data filter condition is a Boolean expression, which can be a nested set of conditions. TigerGraph data loader evaluates the condition for each line in your input file. If the condition evaluates to be true, then the line of data is loaded.
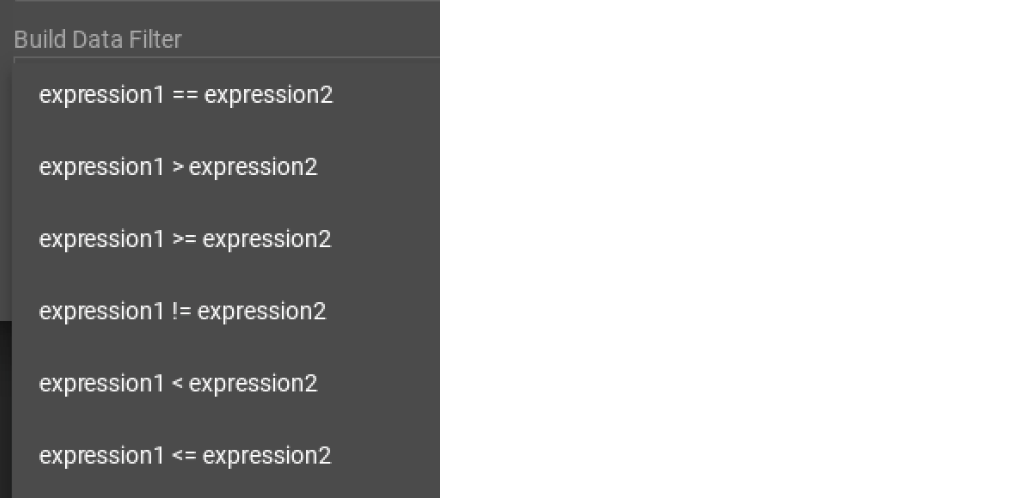
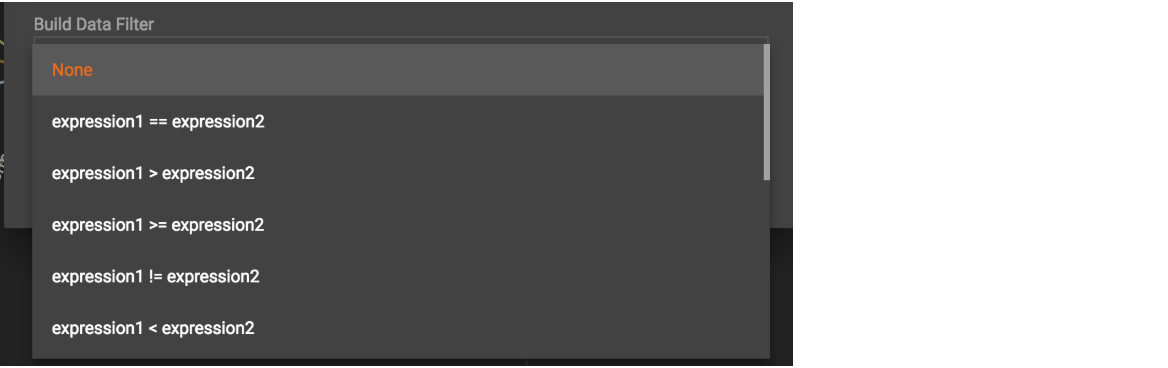
First, click the Build Data Filter chooser (with default value "None"). A menu will appear, with many Boolean expression templates. Choose one of the options. If you plan to build a nested condition, start with your top level. The first several options are for comparison expressions:
After this are several more options, using operators such as AND, OR, NOT, IN, BETWEEN…AND, IS NUMERIC, and IS EMPTY.
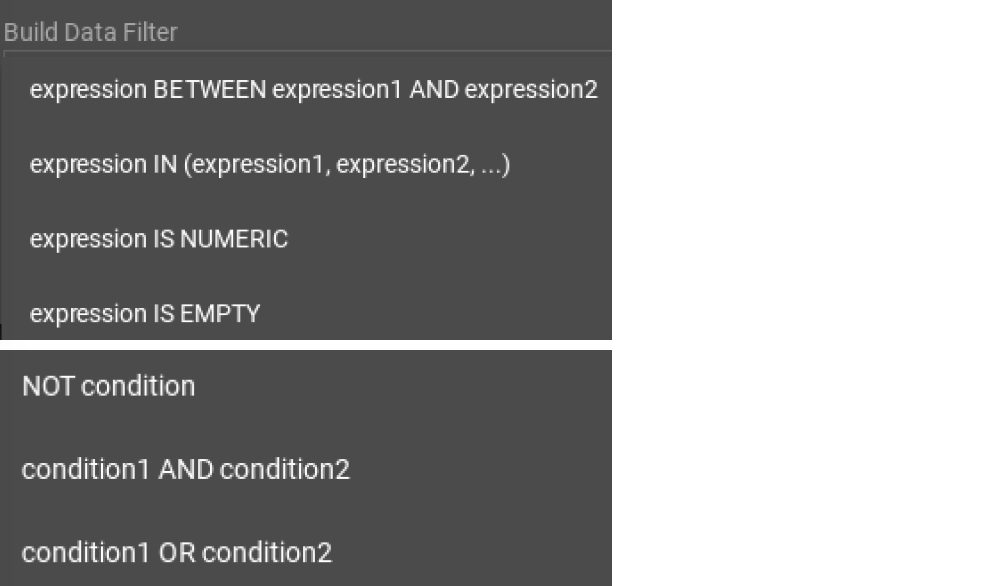
Note that each of these expressions calls for 1, 2, 3, or a list of operands, and the operands themselves can be expressions. When you select an expression, additional choosers will appear below for you to specify the operand expressions. The operand choices are context-sensitive, but typically they include
-
a Data Column from the input file
-
A constant value
-
If the operator is AND, OR, or NOT, then the operand can be another condition. Thus is how conditions can be nested.
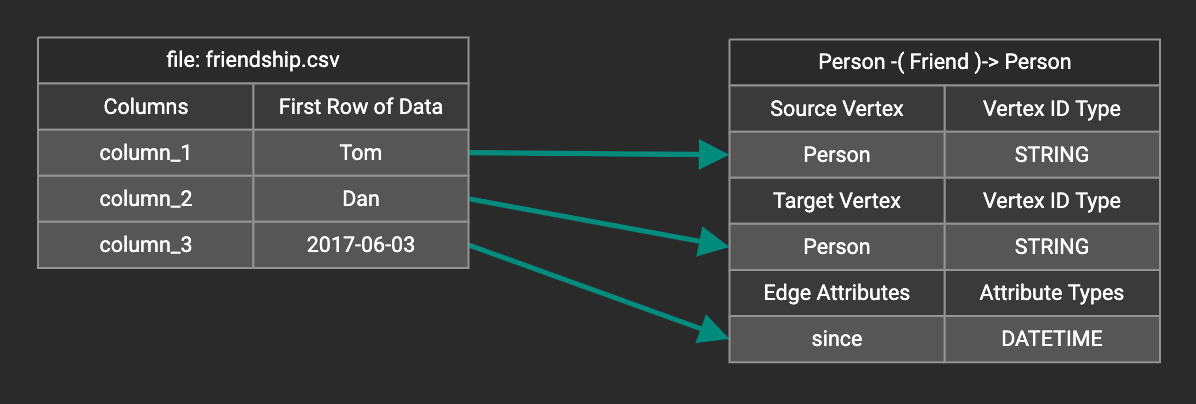
Suppose you are loading friendship edges where the input data fields are (person1, person2, friendship_start_date). You want to load only the records where person1 is Tom and the friendship began on or before 2017-06-10. The data filter looks like the following:
After adding the data filter, the right working panel will look like this:

Hovering the mouse over the data filter indicator  will make the data filter condition appear. If you want to modify the data filter, click the Data Filter
button or double-click the data filter indicator.
The Add Data Filter panel will appear.
will make the data filter condition appear. If you want to modify the data filter, click the Data Filter
button or double-click the data filter indicator.
The Add Data Filter panel will appear.
To remove a data filter, select btn:[None] at the top level dropdown of the Build Data Filter section and then click btn:[ADD] to delete the filter.
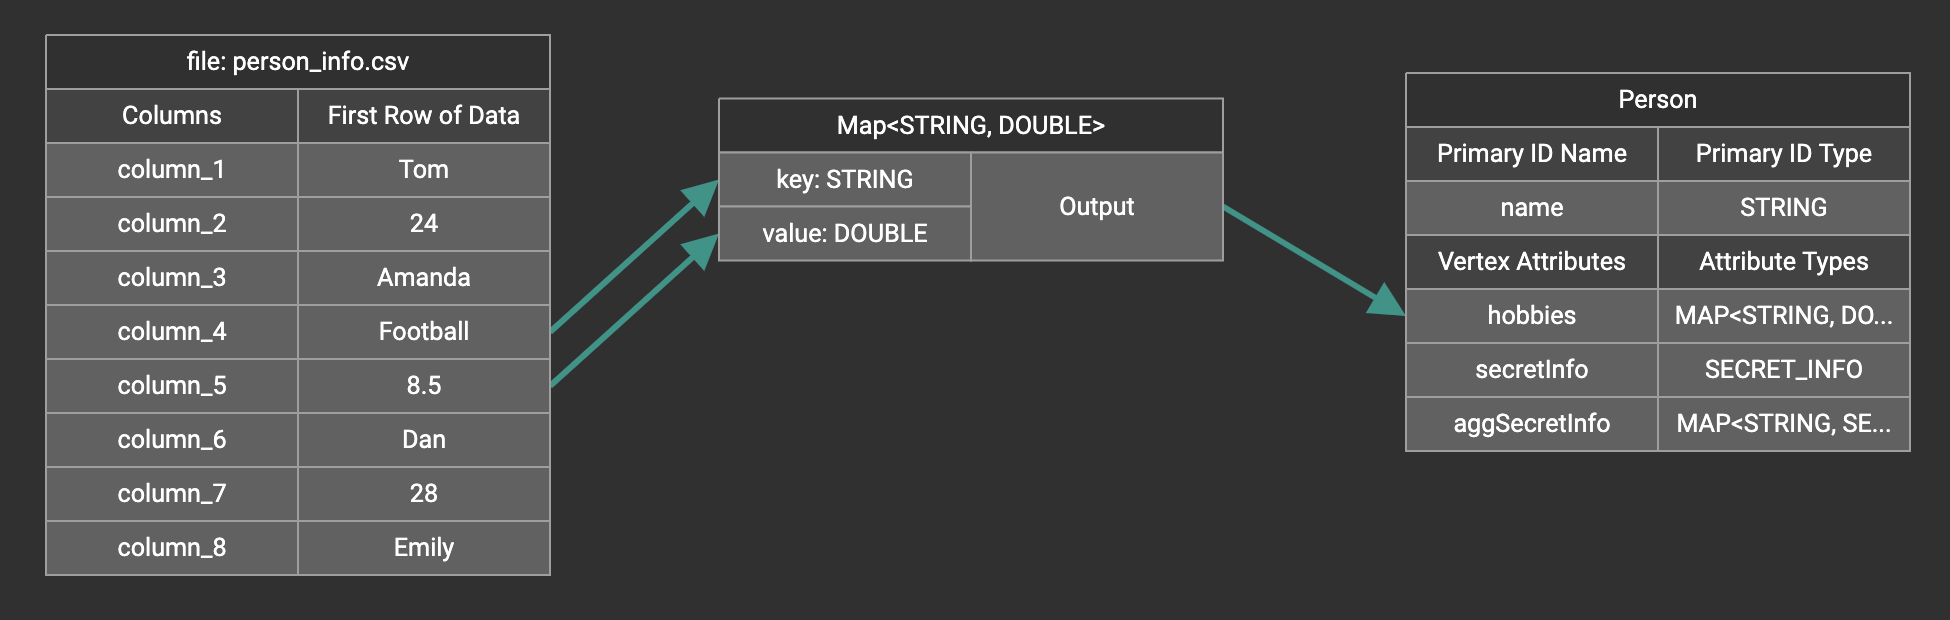
Map data to a map type attribute
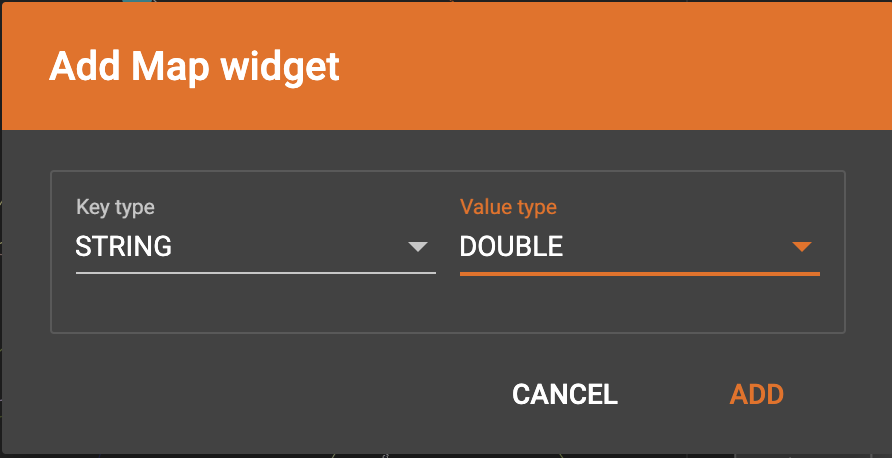
Click  in the dropdown list, then choose key type and value type.
The types must match the key type and value type of the attribute you are mapping towards.
in the dropdown list, then choose key type and value type.
The types must match the key type and value type of the attribute you are mapping towards.
A Map widget will be added to the attribute mapping panel.

Create the mapping from the data columns to the Map widget, and from the Map widget to the attribute.
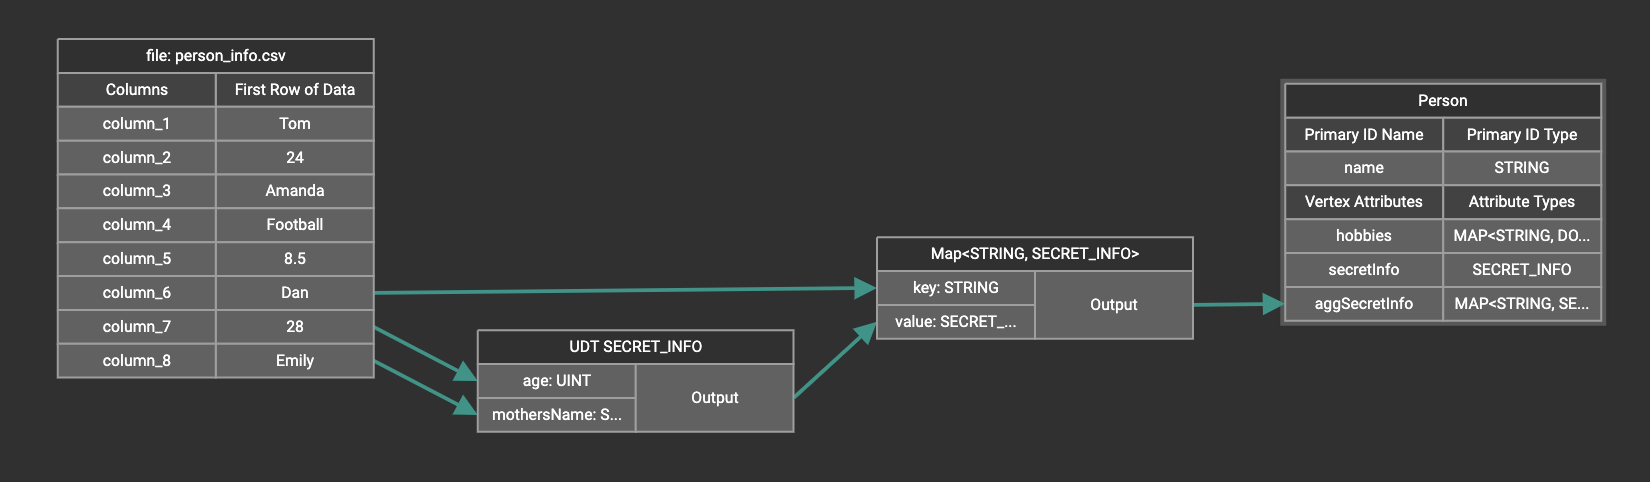
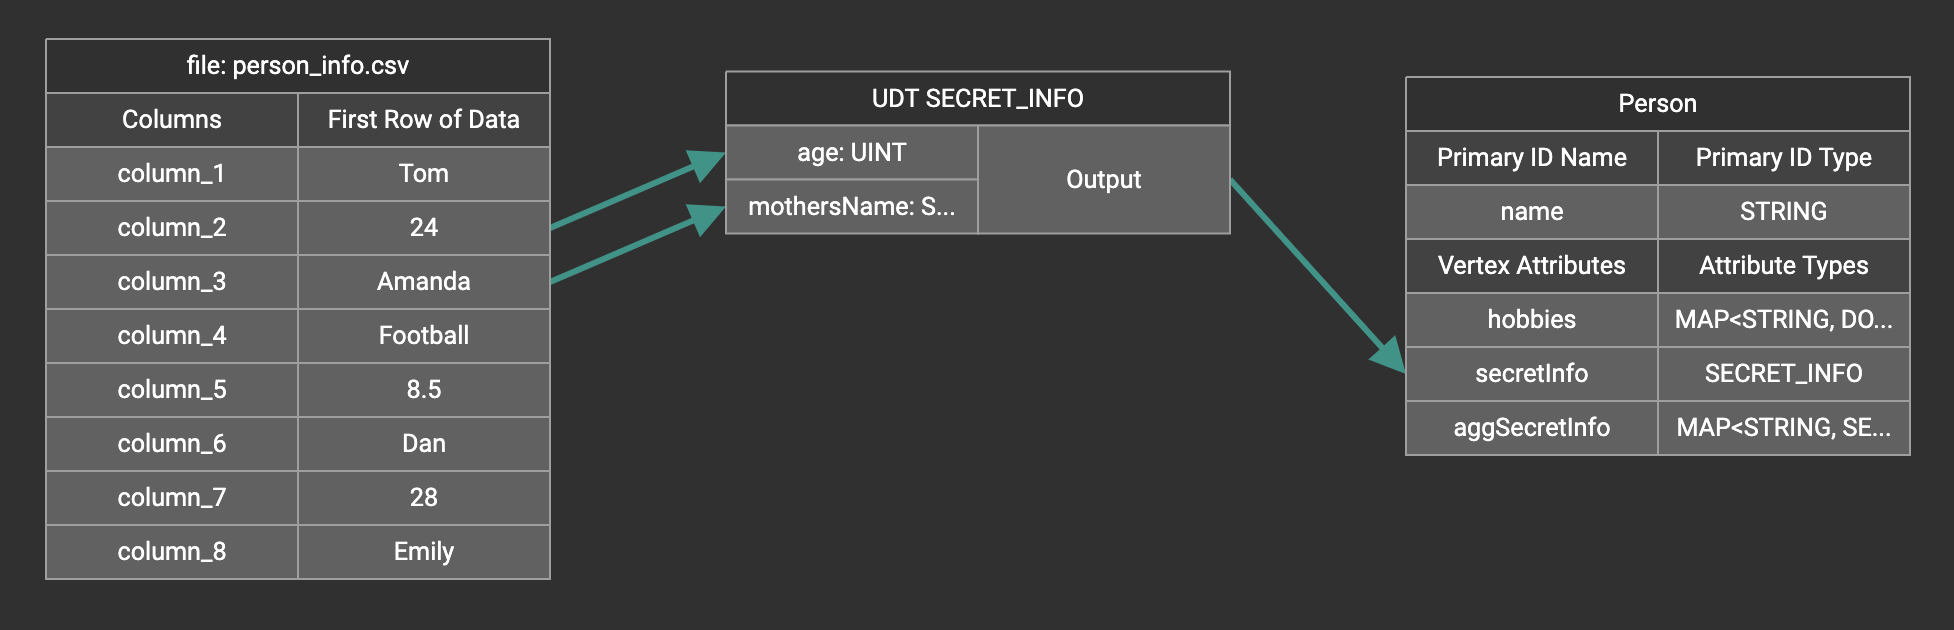
Map data to a UDT type attribute
Choose a UDT name from the dropdown list. The name must match the UDT type of the attribute you are mapping towards.
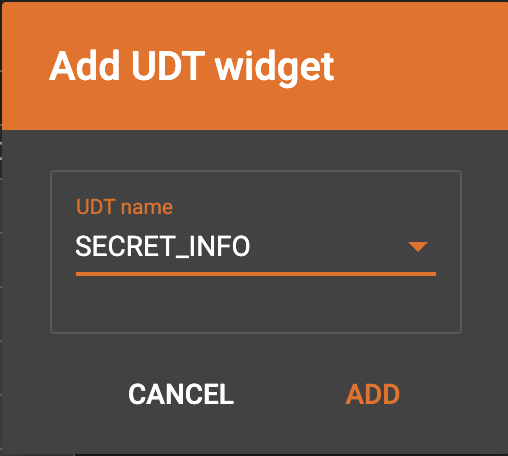
A UDT widget will be added to the attribute mapping panel.
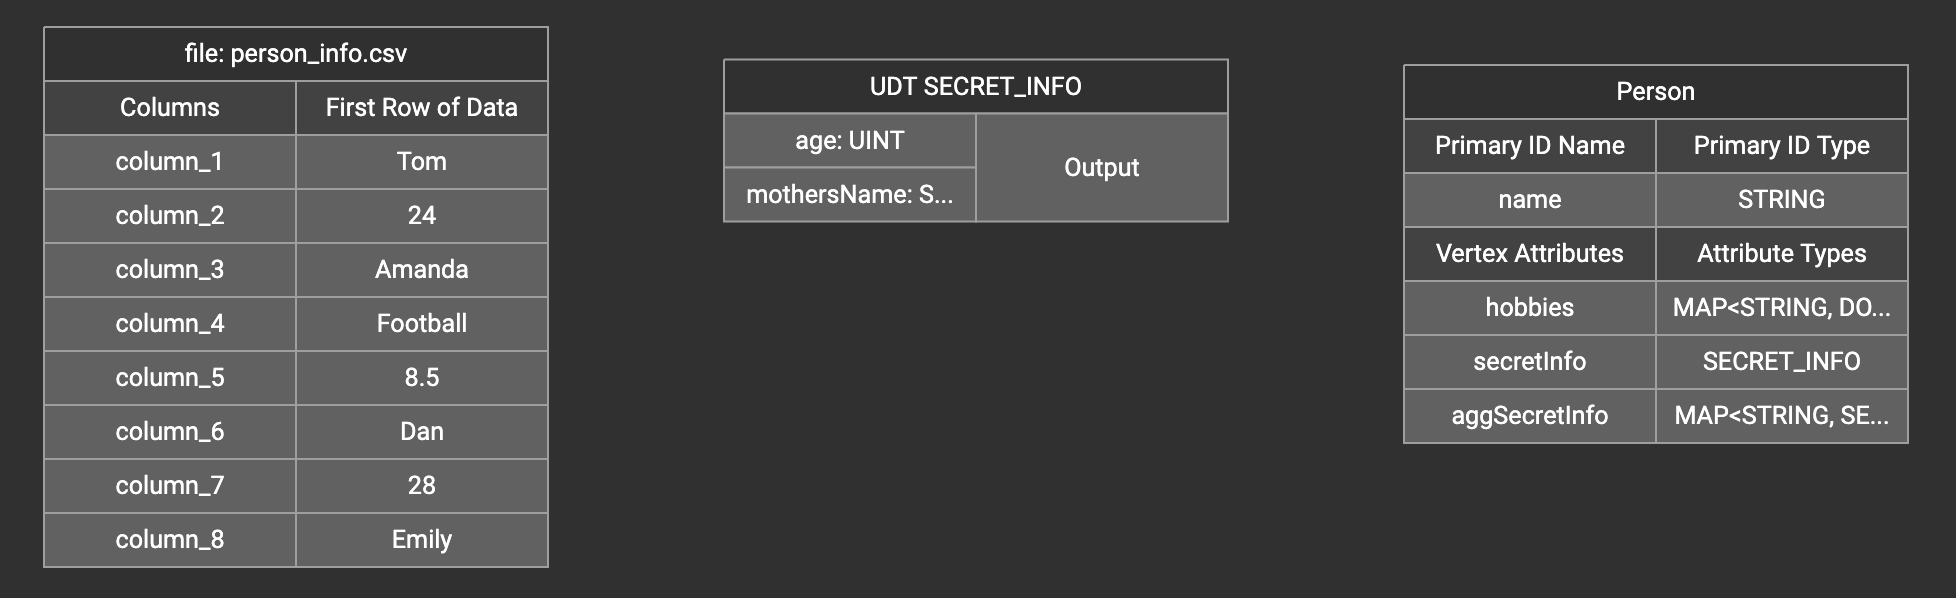
Create the mapping from the data columns to the UDT widget, and from the UDT widget to the attribute.
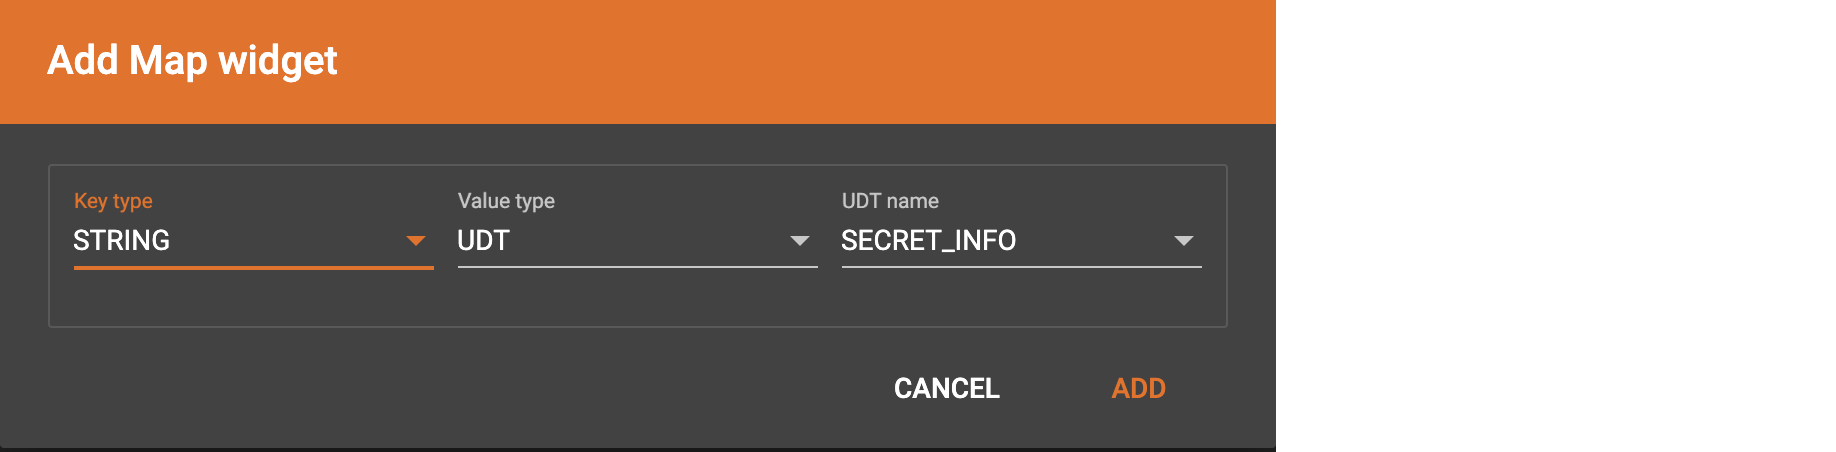
Map data to a map type attribute with UDT value type
If you want to map data to an attribute of map type with UDT value type, you have to combine a Map widget with a UDT widget.
Choose UDT as the value type and then choose the UDT name when adding the Map widget.
Create data mapping between data columns, the UDT widget, the Map widget, and the attribute.