Export and Import Solution
Export and Import
These two features can be found on the GraphStudio Home page.
|
Legacy solutions exported prior to v3.1 cannot be imported into newer versions due to data storage changes made in v3.1. Contact support@tigergraph.com for guidance to import an older solution. |
Export
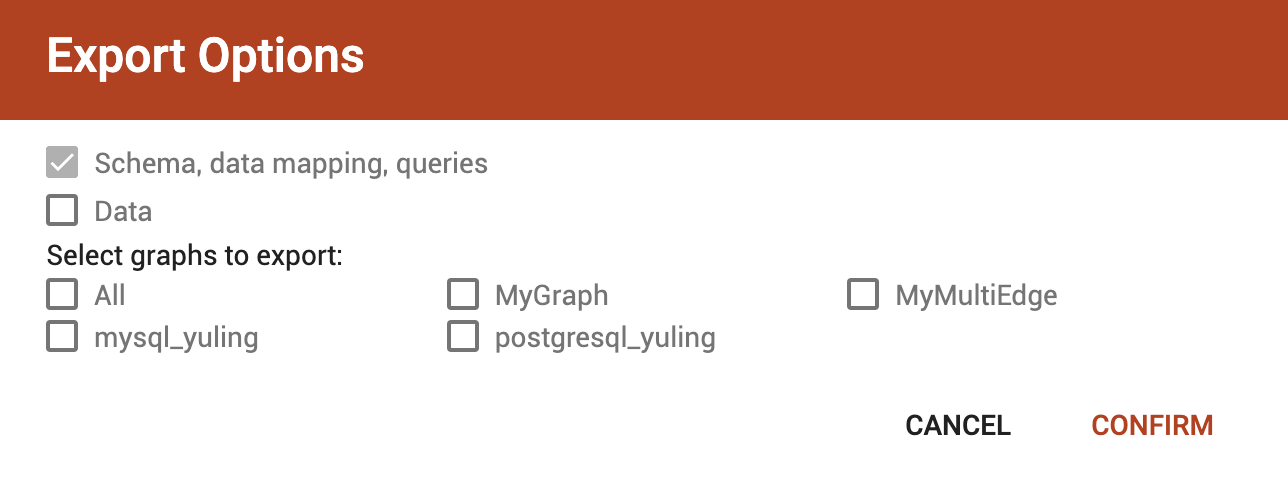
Click Export Current Solution to start to export the whole solution as a tar file.

Select the desired content to export in the pop-up dialog box. By default, it will export the schema, the loading jobs, and the queries. You can also choose to only export specific graphs and decide whether to include the graph data.
|
The exported file also includes metadata that describes the layout of your schema design as well as user-created icons to preserve the design of your GraphStudio solution.
The tar file includes two folders: graph/ and gui/. The graph/ folder includes an ExportedGraph.zip file that contains, but is not limited to, the following files:
-
DBImportExport_<graphName>.gsqlcommand file for each graph called <graphName> in a MultiGraph system. The command file creates the exported graph, including its local vertex, edge, and tuple types, along with its loading jobs, data source file objects and queries. -
global.gsql- Loading job to create all global vertex and edge types and data sources. -
tuple.gsql- Loading job to create all User Defined Tuples.
|
This |
The gui/ folder contains all user icons and a json file that describes the layout of the schema in GraphStudio.
|
Import
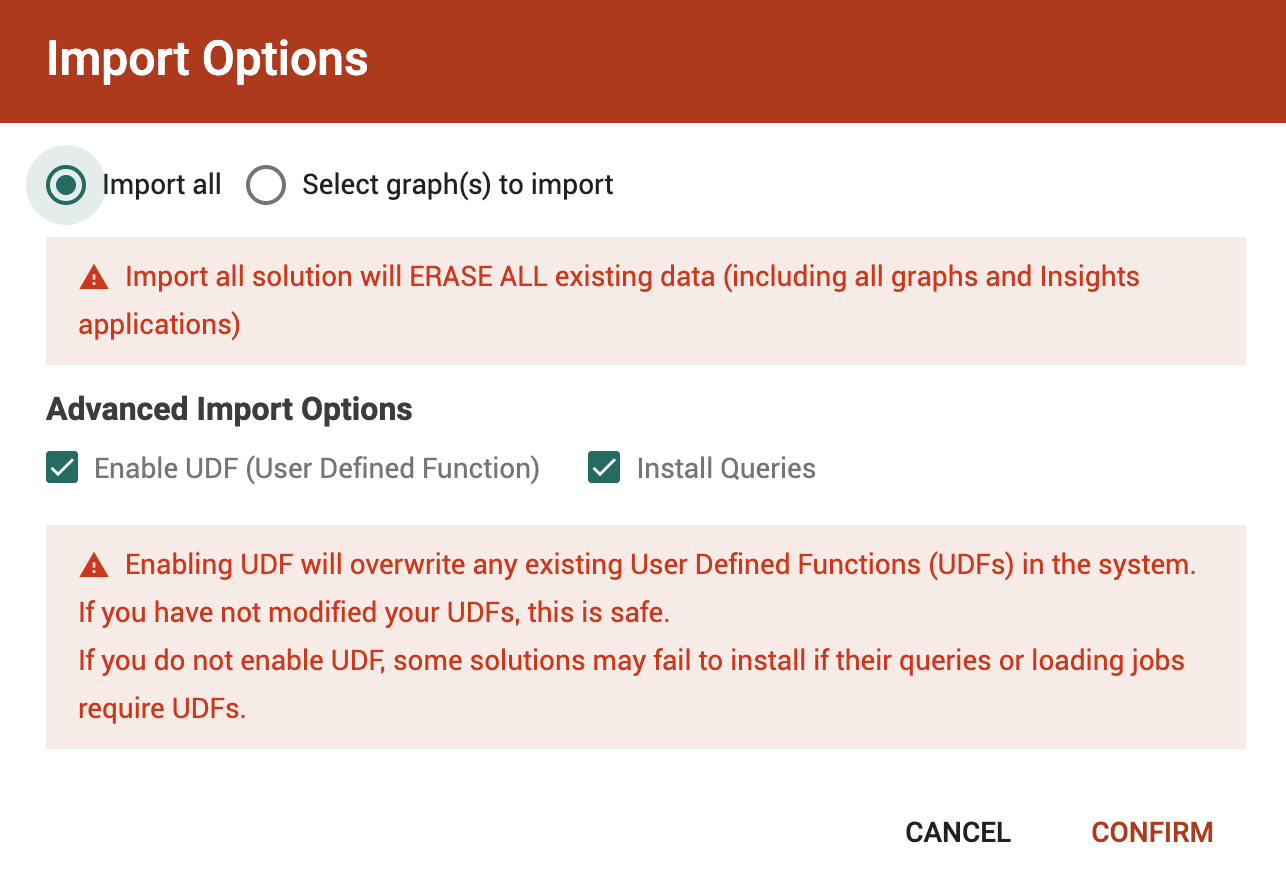
Click Import an Existing Solution to upload a previously exported .tar file.

After uploading the file, you will see a dialog to customize the import options.
|
Enabling User-Defined Functions (UDF) is optional. If you do not enable UDF, some solutions may fail to install if their queries or loading jobs require UDFs.
When you select the |
|
Installing queries is optional. If you do not check the |
|
Importing a solution can overwrite your current database, deleting existing schemas, loading jobs, queries, and data files. This action cannot be undone, regardless of whether the import succeeds or fails. Before importing, create a complete backup in case you need to restore the database. See the Back up a Database Cluster page. |
Install a Pre-Built Solution
Follow these steps to install a pre-built solution package in TigerGraph:
Step 1: Download the Solution
Download the pre-built solution package by clicking the download button.

Step 2: Enable UDF (Optional)
If you are using TigerGraph version 4.2.1 or later, you can skip this step because the import dialog includes an option to enable UDF.
By default, TigerGraph does not enable solutions with User-Defined Functions (UDF). You will need to enable UDF manually if required.
This step is required only for the following solutions:
-
Application Fraud
-
Entity Resolution
To enable UDF, run the following commands:
gadmin config set GSQL.UDF.Policy.Enable false
gadmin config set GSQL.UDF.EnablePutExpr true
gadmin config set GSQL.UDF.EnablePutTokenBank true
gadmin config set GSQL.UDF.EnablePutTgExpr true
gadmin config apply -y
gadmin restart gsql -y
After importing the solution, disable UDF by running:
gadmin config set GSQL.UDF.Policy.Enable true
gadmin config set GSQL.UDF.EnablePutExpr false
gadmin config set GSQL.UDF.EnablePutTokenBank false
gadmin config set GSQL.UDF.EnablePutTgExpr false
gadmin config apply -y
gadmin restart gsql -y
Step 3: Import the Solution
Follow the instructions in the Import section above to import the downloaded solution file.
Step 4: Setup Queries for Insights Application (Optional)
This step is required for solutions that include an Insights application, such as:
-
Transaction Fraud
-
Mule Account Detection
-
Application Fraud
-
Network Infrastructure
After importing the solution, you may need to configure queries for the insights application to enable proper visualization and functionality.
Step 4.1: Install Queries
If you are using TigerGraph version 4.2.1 or later, you can skip this step because the import dialog includes an option to install queries.
By default, imported queries run in interpreted mode. For optimal performance, install the queries first. For detailed instructions, see Install All Queries.
Step 4.2: Preprocess Data
Some solutions require you to run specific queries to preprocess data before the Insights application can display results properly. This preprocessing step is required only for:
-
Mule Account Detection
-
Transaction Fraud
Use the GSQL web shell or command line to run the corresponding preprocessing queries.
Mule Account Detection
use graph Mule_Account_Detection
run query account_account_with_weights()
run query tg_wcc_account_with_weights()
run query tg_pagerank_wt_account()
run query tg_shortest_path_length_account()
Transaction Fraud
use graph Transaction_Fraud
run query merchant_merchant_with_weights()
run query card_card_with_weights()
run query tg_wcc_card_weight_based()
run query tg_wcc_merchant_weight_based()
run query tg_pagerank_wt_merchant()
run query tg_pagerank_wt_card()