Defining a Graph Schema
Before data can be loaded into the graph store, the user must define a graph schema.
A graph schema is a "dictionary" that defines the types of entities, vertices and edges, in the graph and how those types of entities are related to one another. Each vertex or edge type has a name and a set of attributes (properties) associated with it. For example, a Book vertex could have title, author, publication year, genre, and language attributes.
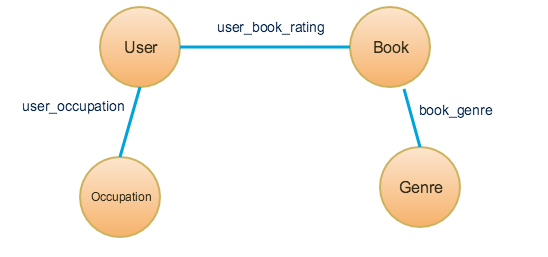
In the figure below, circles represent vertex types, and lines represent edge types. The labeling text shows the name of each type. This example has four types of vertices: User, Occupation, Book, and Genre. Also, the example has 3 types of edges: user_occupation, user_book_rating, and book_genre. Note that this diagram does not say anything about how many users or books are in the graph database. It also does not indicate the cardinality of the relationship. For example, it does not specify whether a User may connect to multiple occupations.
An edge connects two vertices: a source vertex and a target vertex . An edge type can be either directed or undirected. A directed edge has a clear semantic direction, from the source vertex to the target vertex. For example, if there is an edge type that represents a plane flight segment, each segment needs to distinguish which airport is the origin (source vertex) and which airport is the destination (target vertex). In the example schema below, all edges are undirected.
A useful test to decide whether an edge should be directed or undirected is the following: "An edge type is directed if knowing there is a relationship from A to B does not tell me whether there is a relationship from B to A." Having nonstop service from Chicago to Shanghai does not automatically imply there is nonstop service from Shanghai to Chicago.
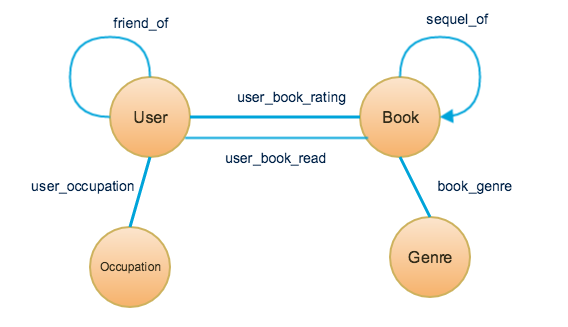
An expanded schema is shown below, containing all the original vertex and edge types plus three additional edge types: friend_of, sequel_of, and user_book_read. Note that friend_of joins a User to a User. The friendship is assumed to be bidirectional, so the edge type is undirected. Sequel_of joins a Book to a Book but it is directed, as evidenced by the arrowhead. The Two Towers is the sequel of The Fellowship of the Ring , but the reverse is not true. User_book_read is added to illustrate that there may be more than one edge type between a pair of vertex types.
The TigerGraph system user designs a graph schema to fit the source data and the user’s needs and interests. The TigerGraph system user should consider what type of relationships are of interest and what type of analysis is needed. The TigerGraph system lets the user modify an existing schema, so the user is not locked into the initial design decision.
In the first schema diagram above, there are seven entities: four vertex types and three edge types. You may wonder why it was decided to make Occupation a separate vertex type instead of an attribute of User. Likewise, why is Genre a vertex type instead of an attribute of Book? These are examples of design choices. Occupation and Genre were separated out as vertex types because in graph analysis, if an attribute will be used as a query variable, it is often easier to work with as a vertex type.
Once the graph designer has chosen a graph schema, the schema is ready to be formalized into a series of GSQL statements.
|
Graph Creation and Modification Privileges
You need the To learn more about permission and privileges, see Access Control Model in TigerGraph. |
CREATE VERTEX
Required privilege: WRITE_SCHEMA
The CREATE VERTEX statement defines a new global vertex type with a name, primary key, and an attribute list.
Data loaded to a global vertex type in one graph will be shared across all graphs that use that vertex type.
See Global vs. local schema changes for instructions on creating local vertices.
At a high level, the CREATE VERTEX syntax is as follows:
CREATE VERTEX vertex_type_name "("id_and_attribute_list")" [vertex_options]
Primary ID/key options
There are three variations of id_and_attribute_list, based on whether the key is to be treated as an attribute and whether the key is a composite key:
-
Using
PRIMARY_IDto define the ID. By default, the ID is not considered an attribute, so it cannot be read and used in expressions with the same flexible as regular attributes. The advantage of this mode is that vertices are stored more compactly. -
Using
PRIMARY KEYto designate one attribute as the primary key.
|
If you have a single attribute which serves as your primary key, use the |
Regardless of which option is selected, GSQL automatically creates a hash index of the key for fast O(1) searches.
The syntax for the three options are summarized below.
id_and_attribute_list :=
  PRIMARY_ID id_name id_type ["," attribute_list] (1)
  | id_name id_type PRIMARY KEY ["," attribute_list] (2)
  | attribute list "," PRIMARY KEY "("key_list")" (3)

attribute_list :=
  attribute_name type [DEFAULT default_value]
  ["," attribute_name type [DEFAULT default_value] ]*
id_type may be STRING, INT, UINT, or DATETIME.
Once a vertex is inserted, its ID value cannot be modified. Every vertex must have a unique ID value, of course.
| An empty string is not a valid value for a vertex primary ID. Beginning with v3.7.1, GSQL will reject attempts to insert or load a vertex whose ID is an empty string. |
Maximum Size
A vertex primary key has a length limit of 16384 bytes. The size of a vertex, including all of its attributes, cannot exceed 10 megabytes.
The following sections go into detail for each of the primary id/key options, attribute lists, and the vertex options.
PRIMARY_ID
This is GSQL’s original syntax and semantics.
Its data type may be STRING, INT, UINT, or DATETIME.
Its syntax for the id_and_attribute_list term is as follows:
PRIMARY_ID id_name id_type "," attribute_list
Example:
CREATE VERTEX Movie (id UINT PRIMARY KEY, name STRING, year UINT)By default, a vertex type which is defined with PRIMARY_ID cannot treat the ID as a regular attribute. For example, if the ID’s field name is serial_num, neither of the following syntaxes are valid:
  v.serial_num  //  error: not supported
  v.id  //  error: id is not a built-in function or field name
If you want to retreive a vertex having a specific ID, you can use the to_vertex(id, type) function.
See the next section to see how to override the default behavior and treat the primary ID as attribute.
WITH primary_id_as_attribute
If the WITH … primary_id_as_attribute="true" option is declared, then the ID can be treated as a readable attribute.
Internally, the ID is being stored a second time, once as an ID and once as a write-once attribute.
This is exactly the same way that PRIMARY KEY allows the ID to be treated as a vertex.
Using this option eliminates the storage advantage of PRIMARY_ID in exchange for greater flexible in query operations.
Example:
CREATE VERTEX Movie (PRIMARY_ID id UINT, name STRING, year UINT) WITH primary_id_as_attribute="true"PRIMARY KEY
Instead of the legacy PRIMARY_ID syntax, GSQL offers another option for specifying the primary key.
Append the keyword phrase PRIMARY KEY to any one of the attributes in the attribute list to make the attribute the primary key.
It is conventional for the primary key to be the first attribute.
The primary key data type must be STRING, INT, or UINT.
Its syntax for the id_and_attribute_list term is as follows:
[attribute_list ", "] id_attribute_name key_type PRIMARY KEY ["," attribute_list]
Example:
CREATE VERTEX Movie (id UINT PRIMARY KEY, name STRING, year UINT)|
PRIMARY KEY is not supported in GraphStudio. If you define a vertex type using the PRIMARY KEY syntax, you will not be able to use that vertex type or the global schema in GraphStudio. |
Composite Key using PRIMARY KEY
GSQL supports composite keys - grouping multiple attributes to create a primary key for a specific vertex. To specify a composite key, first definite all the vertex type’s attributes. Follow that with the keyword PRIMARY KEY and then the parenthesized list of attributes that form the composite key.
Its syntax for the id_and_attribute_list term is as follows:
attribute_list "," PRIMARY KEY "(" attribute_name ("," attribute_name)* ")"Example:
CREATE VERTEX Movie (id UINT, title STRING, year UINT, PRIMARY KEY (title,year,id))|
Composite keys are not supported in GraphStudio. If you define a vertex type with composite keys, you will not be able to use that vertex type or the global schema in GraphStudio. |
Vertex Attribute List
The attribute list is a list of one or more id definitions and attribute descriptions separated by commas:
attribute_list :=
  attribute_name type [DEFAULT default_value]
  ["," attribute_name type [DEFAULT default_value] ]*
The available attribute types, including user-defined types, are listed in the section Attribute Data Types.
-
Every attribute data type has a built-in default value (e.g., the default value for INT type is 0). The
DEFAULT default_valueoption overrides the built-in value. -
There is no maximum number of attributes, but there is a maximum storage size for a vertex.
Example:
-
Create vertex types for the graph schema of Figure 1.
CREATE VERTEX User (PRIMARY_ID user_id UINT, name STRING, age UINT, gender STRING, postalCode STRING)
CREATE VERTEX Occupation (PRIMARY_ID occ_id UINT, occ_name STRING)
    WITH STATS="outdegree_by_edgetype"
CREATE VERTEX Book (PRIMARY_ID bookcode UINT, title STRING, pub_year UINT)
    WITH STATS="none"
CREATE VERTEX Genre (PRIMARY_ID genre_id STRING, genre_name STRING)
Unlike the tables in a relational database, vertex types do not need to have a foreign key attribute for one vertex type to have a relationship to another vertex type. Such relationships are handled by edge types.
Vertex Options
vertex_option :=
WITH [STATS="none"|"outdegree_by_edgetype"]
[primary_id_as_attribute="false"]
The primary_id_as_attribute option was described with PRIMARY ID.
WITH STATS
By default, when the loader stores a vertex and its attributes in the graph store, it also stores some statistics about the vertex’s outdegree — how many connections it has to other vertices.
The optional WITH STATS clause lets the user control how much information is recorded. Recording the information in the graph store will speed up queries which need degree information, but it increases the memory usage.
There are two* options.
-
If
outdegree_by_edgetypeis chosen, then each vertex records a list of degree count values, one value for each type of edge in the schema. -
If "none" is chosen, then no degree statistics are recorded with each vertex. If the
WITH STATSclause is not used, the loader acts as ifoutdegree_by_edgetypewere selected.
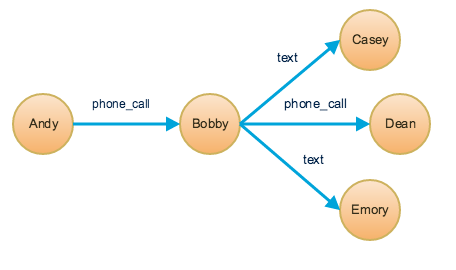
The graph below has two types of edges between persons: phone_call and text. For Bobby, the outdegree_by_edgetype option records how many phone calls Bobby made (1) and how many text messages Bobby sent (2). This information can be retrieved using the built-in vertex function outdegree(). To get the outdegree of a specific edge type, provide the edge type name as a string parameter. To get the total outdegree, omit the parameter.
| WITH STATS option (case-insensitive) | Bobby.outdegree() | Bobby.outdegree("text") | Bobby.outdegree("phone_call") |
|---|---|---|---|
"none" |
not available |
not available |
not available |
"outdegree_by_edgetype" (default) |
3 |
2 |
1 |
CREATE EDGE
CREATE EDGE defines a new global edge type. Data loaded to a global edge type in one graph will be shared across all graphs that use that edge type.
See Global vs. local schema changes for instructions on creating local edges.
There are two forms of the CREATE EDGE statement, one for directed edges and one for undirected edges.
Each edge type must specify that it connects FROM one vertex type TO another vertex type.
Additional pairs of FROM and TO vertex types may be added.
Then additional attributes may be added.
Each attribute follows the same requirements as described in the Attribute List subsection for the CREATE VERTEX section.
CREATE UNDIRECTED EDGE Edge_Type_Name "("
        FROM Vertex_Type_Name "," TO Vertex_Type_Name
   ["|" FROM Vertex_Type_Name, TO Vertex_Type_Name]*
   ["," attribute_name type [DEFAULT default_value]]* ")"
CREATE DIRECTED EDGE Edge_Type_Name "("
FROM Vertex_Type_Name "," TO Vertex_Type_Name
["|" FROM Vertex_Type_Name, TO Vertex_Type_Name]*
["," attribute_name type [DEFAULT default_value]]* ")"
[WITH REVERSE_EDGE="Rev_Name"]A single edge type can be defined between multiple pairs of vertex types, e.g.
CREATE DIRECTED EDGE Member_Of (FROM Person, TO Org | FROM Org, TO Org,
                               joined DATETIME)
Note that edges do not have a PRIMARY_ID field.
Instead, each edge is uniquely identified by a FROM vertex, a TO vertex, and optionally other attributes.
The edge type may also be a distinguishing characteristic. For example, as shown in Figure 2 above, there are two types of edges between User and Book. Therefore, both types would have attribute lists which begin (FROM User, To Book,...).
Creating an Edge from or to Any Vertex Type
An edge type can be defined which connects FROM and/or TO any of the currently defined types of vertices. Use the wildcard symbol * to indicate "any vertex type". For example, the Any_Edge type below can connect from any vertex to any other vertex:
CREATE DIRECTED EDGE Any_Edge (FROM *, TO *, label STRING)|
If new vertex types are added after a wildcard edge type is defined, the new vertex types are NOT included in the wildcard. That is, |
WITH REVERSE_EDGE
If a CREATE DIRECTED EDGE statement includes the WITH REVERSE_EDGE=" rev_name " optional clause, then an additional directed edge type called rev_name is automatically created, with the FROM and TO vertices swapped.
Moreover, whenever a new edge is created, a reverse edge is also created.
The reverse edge will have the same attributes, and whenever the principal edge is updated, the corresponding reverse edge is also updated.
In a TigerGraph system, reverse edges provide the most efficient way to perform graph queries and searches that need to look "backwards". For example, referring to the schema of Figure 2, the query "What is the sequel of Book X, if it has one?" is a forward search, using Sequel_Of edges. However, the query "Is Book X a sequel? If so, what Book came before X?" requires examining reverse edges.
Example:
Create undirected edges for the three edge types in Figure 1.
CREATE UNDIRECTED EDGE User_Occupation (FROM User, TO Occupation)
CREATE UNDIRECTED EDGE Book_Genre (FROM Book, TO Genre)
CREATE UNDIRECTED EDGE User_Book_Rating (FROM User, TO Book, rating UINT, date_time UINT)
The User_Occupation and Book_Genre edges have no attributes. A User_Book_Rating edge symbolizes that a user has assigned a rating to a book. Therefore it includes an additional attribute rating. In this case the rating attribute is defined to be an integer, but it could just as easily have been set to be a float attribute.
Example:
Create the additional edges depicted in Figure 2.
CREATE UNDIRECTED EDGE Friend_Of (FROM User, TO User, on_date UINT)
CREATE UNDIRECTED EDGE User_Book_Read (FROM User, To Book, on_date UINT)
CREATE DIRECTED EDGE Sequel_Of (FROM Book, TO Book) WITH REVERSE_EDGE="Preceded_By"
Every time the GSQL loader creates a Sequel_Of edge, it will also automatically create a Preceded_By edge, pointing in the opposite direction.
TYPEDEF
User-defined tuple types defined in a query cannot be used outside their queries or across queries. To use a user-defined tuple or an accumulator that uses a user-defined tuple across queries (such as for the return type of a subquery ), the tuple and the accumulator type must be defined on the catalog level as part of the schema. User-defined types at the catalog level can only be used for query return value types, and cannot be used as an attribute data type.
TYPEDEF statements can be used outside a query to define tuple types, GroupBy accumulator types, and heap accumulator types.
Once defined, all graphs in the database have access to these user-defined types, and subqueries can be defined to return the user-defined types.
Example:
The example below defines a tuple type My_Tuple and a heap accumulator type My_Heap, so that the subquery Sub_Query_1 can return a value of My_Heap type to its outer query Query_1.
// Define the heap accumulator at the catalog level
TYPEDEF TUPLE<name string, friends int> My_Tuple
TYPEDEF HeapAccum<My_Tuple>(3, friends DESC) My_Heap

CREATE QUERY subquery1() FOR GRAPH Social_Net RETURNS (My_Heap){
	My_Heap @@heap;
	SumAccum<int> @friends;
	Start = {Person.*};
	Start = SELECT s from Start:s-(Friend:e)-:t
	        ACCUM s.@friends += 1
	        POST-ACCUM @@heap += My_Tuple(s.id,s.@friends);
	RETURN @@heap;
}

CREATE QUERY Query_1() FOR GRAPH Social_Net {
	PRINT Sub_Query_1();
}
ALTER INDEX
User-defined indexes (or secondary indexes, as they are called commonly called in the database industry) are a valuable feature that enhances the performance of a database system. Indexes allow users to perform fast lookups on non-key columns or attributes without a full-fledged scan.
The TigerGraph database allows users to define on vertex attributes. The user has the flexibility to create indexes in an empty graph initially or to add indexes later when the database is running. If the index is added on an existing vertex, index data is built in the background.
Indexes can be created on vertices on a single attribute of the following data types only: STRING, UINT, INT, and DATETIME. Indexes will be used to optimize queries with all predicate types. However, if a predicate uses an in-built function, then index will not be used to optimize the query. Also, built-in queries are not optimized using indexes.
|
Indexes are very important for data retrieval performance. However, adding indexes will affect write performance. For this reason, users should use caution when adding indexes. Users should review the querying patterns to decide where indexes can help. |
Users can create and drop indexes using ALTER VERTEX command as shown below.
Syntax:

CREATE GLOBAL SCHEMA_CHANGE job <job-name>
{
  ALTER VERTEX Object_Type_Name ADD INDEX Index_Type_Name ON (Attribute_Name);
  ALTER VERTEX Vertex_Type_Name DROP INDEX Index_Type_Name;
};
Example:
ALTER VERTEX User ADD INDEX user_country_index ON (country);
CREATE GRAPH
CREATE GRAPH defines a graph schema, which contains the given vertex types and edge types, and prepares the graph store to accept data.
The vertex types and edge types may be listed in any order.
Executing CREATE GRAPH will set the new graph to be the working graph.
Required privilege
WRITE_SCHEMA
CREATE GRAPHCREATE GRAPH Graph_Name (Vertex_Or_Edge_Type, Vertex_Or_Edge_Type...) (1)(2)
[WITH ADMIN username]| 1 | Replace graph_name with the name you want to name the graph with |
| 2 | Replace vertex_or_edge_type with the vertex and edge types you want to include in the graph |
The optional WITH ADMIN clause sets the named user to be the admin for the new graph.
Instead of providing a list of specific vertex types and edge types, you can define a graph type that includes all the available vertex types and edge types by replacing the list of vertex and edge types with *.
You can also create a graph with no vertex or edge types. A schema change can be used later to add vertex and edge types.
CREATE GRAPH with all vertex & edge types and with an empty domain.CREATE GRAPH Everything_Graph (*)
CREATE GRAPH Empty_Graph ()Examples
Create graph Book_rating for the edge and vertex types defined for the below:
CREATE VERTEX User (PRIMARY_ID user_id UINT, name STRING, age UINT, gender STRING, postalCode STRING)
CREATE VERTEX Occupation (PRIMARY_ID occ_id UINT, occ_name STRING) WITH STATS="outdegree_by_edgetype"
CREATE VERTEX Book (PRIMARY_ID bookcode UINT, title STRING, pub_year UINT) WITH STATS="none"
CREATE VERTEX Genre (PRIMARY_ID genre_id STRING, genre_name STRING)
CREATE UNDIRECTED EDGE User_Occupation (FROM User, TO Occupation)
CREATE UNDIRECTED EDGE Book_Genre (FROM Book, TO Genre)
CREATE UNDIRECTED EDGE User_Book_Rating (FROM User, TO Book, rating UINT, date_time UINT)
CREATE UNDIRECTED EDGE Friend_Of (FROM User, TO User, on_date UINT)
CREATE UNDIRECTED EDGE User_Book_Read (FROM User, To Book, on_date UINT)
CREATE DIRECTED EDGE Sequel_Of (FROM Book, TO Book) WITH REVERSE_EDGE="Preceded_By"
CREATE GRAPH Book_Rating (*) (1)| 1 | Having created all the necessary vertex and edge types, use the * sign to include all vertex and edge types in the graph. |
CREATE GRAPH … AS (Beta)
CREATE GRAPH … AS creates a tag-based graph of an existing graph. Tag-based graphs include vertices with specific tags from their base graphs, and have their own access control.
Users can be granted roles on a tag-based graph and their roles will give them privileges that only apply to the resources in the tag-based graph.
This command can only be run on the base graph and requires the user to have the schema-editing privilege on the base graph.
<create_tag_graph> :=
    CREATE GRAPH <tag_graph_name> AS <base_graph_name>
    ( "(" <tagged_element_name> ("," <tagged_element_name>)* ")" | ":" <tag_expr> )

<tagged_element_name> := <tagged_vertex_name> | <edge_name>

<tagged_vertex_name> := <vertex_name> [":" <tag_expr>]

<tag_expr> := <tag> ("&" <tag_expr>)*
The syntax for creating tag-based graphs is the same as creating a regular graph except that a base graph must be specified with the AS clause after the CREATE GRAPH command, and the definition of the graph must include at least one tagged vertex type. Edges are not tagged in a tag-based graph, but edges with either a source or a target outside of the tag-based graph are not visible to users of the tag-based graph.
USE GRAPH
|
New requirement for MultiGraph support. Applies even if only one graph exists. |
Before a user can use a graph, the user must be granted a role on that graph by an admin user of that graph or by a superuser. (Superusers are automatically granted the admin role on every graph). Second, for each GSQL session, the user must set a working graph. The USE GRAPH command sets or changes the user’s working graph, for the current session.
For more about roles and privileges, see the document Managing User Privileges and Authentication.
USE GRAPH gnameInstead of the USE GRAPH command, gsql can be invoked with the -g <graph_name> option.
DROP GRAPH
Required privilege
WRITE_SCHEMA
The DROP GRAPH command deletes the logical definition of the named graph. It will also delete all local vertex or edge types. Local vertex and edge types are created by an ADD VERTEX/EDGE statement within a SCHEMA_CHANGE JOB and so belong only to that graph. Any shared types are unaffected. To delete only selected vertex types or edge types, see DROP VERTEX | EDGE in the Section "Modifying a Graph Schema".
DROP ALL
Required privilege
Drop_ALL
The DROP ALL command clears the graph store (i.e. deletes all data) and removes all definitions from the catalog: vertex types, edge types, graph types, jobs, and queries.
Unlike the gsql --reset command, DROP ALL does not erase user and role information.
|
|
SHOW - View Parts of the Catalog
The SHOW command can be used to show certain aspects of the graph, instead of manually filtering through the entire graph schema when using the ls command. You can either type the exact identifier or use regular expressions / Linux globbing to search.
SHOW <VERTEX> | <EDGE> | <JOB> | <QUERY> | <GRAPH> [ <name> | <glob> | -r <regex> ]SHOW GRAPH lists vertices and edges without giving their properties, and is also a way to check the JSON API and syntax versions of the graph, as well as any loading jobs. SHOW VERTEX and SHOW EDGE list the properties of the desired vertex or edge respectively.
This feature supports the ? and * from linux globbing operations, and also regular expression matching.
Usage of the feature is limited to the scope of the graph the user is currently in - if you are using a global graph, you will not be able to see vertices that are not included in your current graph.
|
Regular expression searching will not work with escaping characters. |
To use regular expressions, you will need to use the -r flag after the part of the schema you wish to show. If you wish to dive deeper into regular expressions, visit "Java Patterns". The following are a few examples of what is supported by the SHOW command.
Linux Globbing examples
SHOW VERTEX us*            //shows all vertices that start with the letters "Us"
SHOW VERTEX co?*y          //shows the vertices that starts with co and ends with y
SHOW VERTEX ?????          //shows all vertices that are 5 letters long

Regular Expression Examples
SHOW VERTEX -r "skil{2}"    //match the pattern "skill"
SHOW EDGE -r "test[1][13579]*"    //match pattern that only contains odd numbers after "test"
SHOW JOB -r "[a-zA-Z]*"     //match all jobs that contain only letters